This guide covers the merchant side of your online store — the screens only you and your staff see. It follows one continuous path: set the store up once, publish your products, get the link and the products in front of customers, then handle what comes back. What your customers see is covered in the separate Shopper's Guide; the rest of the app (sales, invoices, reports) is in the main web app guides.
1. The merchant menu at a glance
Every storefront screen carries the same bar across the top. Your store name sits on the left; the actions run to the right.
| Menu item | What it opens |
|---|---|
| Share Items | Your published products, each with a Share button and a ⋯ menu. This is also the only way in to the SMS screen for a product. |
| Orders | Customers' orders — review, confirm and convert them to invoices. |
| Store Settings ▾ | A drop-down in three groups: Catalogue — Item Categories, Delivery Fees, Affiliate Marketing Messaging — SMS Notification, Back-order Notifications, Buy SMS Unit Account — Wallet, Setup |
| Store Link | Pops up your storefront address with a Copy button. |
| Publish Item | The three ways to put a product on your storefront. |
| Logout | Signs out of the storefront back office. |
2. Store setup
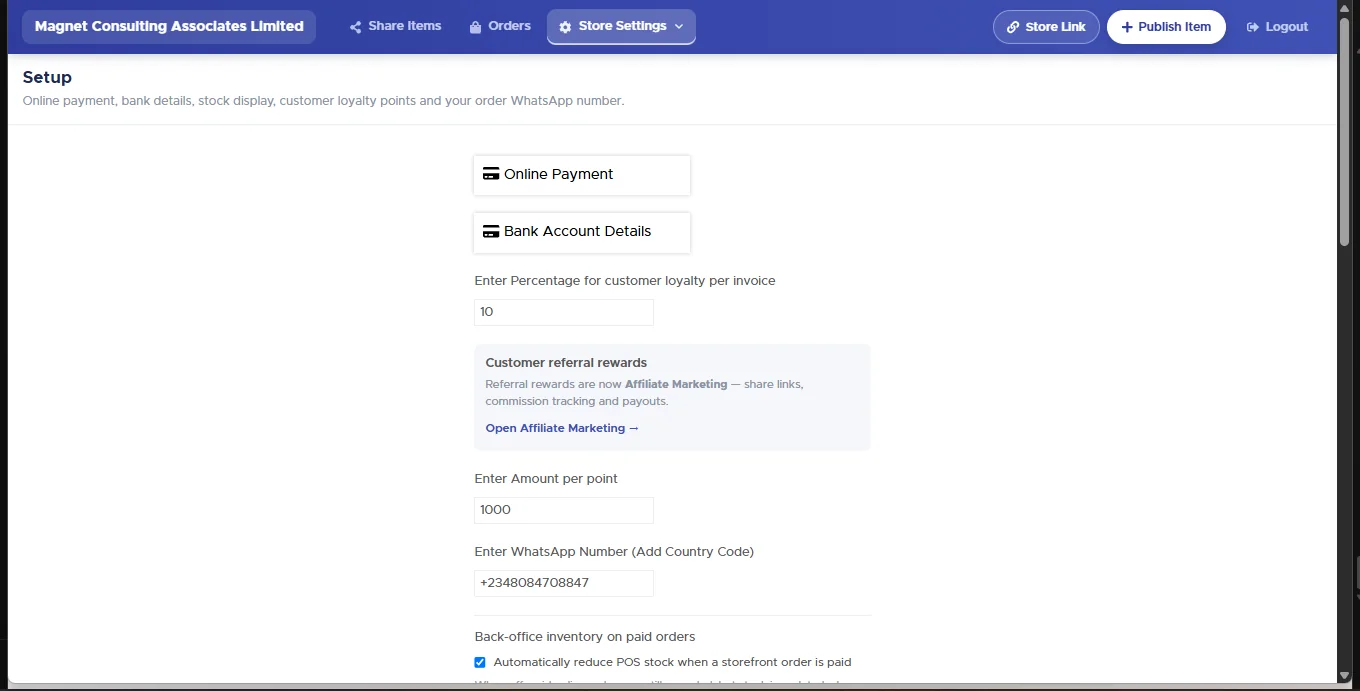
Do this once, before you publish anything. Open Store Settings → Setup. The page runs top to bottom through payment, contact, loyalty, and how stock behaves online.
2.1 Getting paid
- Online Payment — connect Paystack or Rave (Flutterwave) so customers can pay by card, bank transfer or USSD at checkout.
- Bank Account Details — the account your online takings are paid out to. Set this before you switch online payment on.
2.2 Your order WhatsApp number
Enter WhatsApp Number (Add Country Code) — include the country code, e.g. +2348084708847. This is the number customers reach you on from the storefront, so check it is a phone that is actually watched during trading hours.
2.3 Loyalty and referrals
- Enter Percentage for customer loyalty per invoice — how much of each invoice turns into points.
- Enter Amount per point — what one point is worth when redeemed.
- Customer referral rewards — referrals now live in Affiliate Marketing (share links, commission tracking, payouts). Open it from the link on this panel or from Store Settings.
2.4 Stock: the three settings that decide what shoppers see
These sit lower down the same page and they matter more than anything else on it, because they decide whether a customer can order something you haven't got.
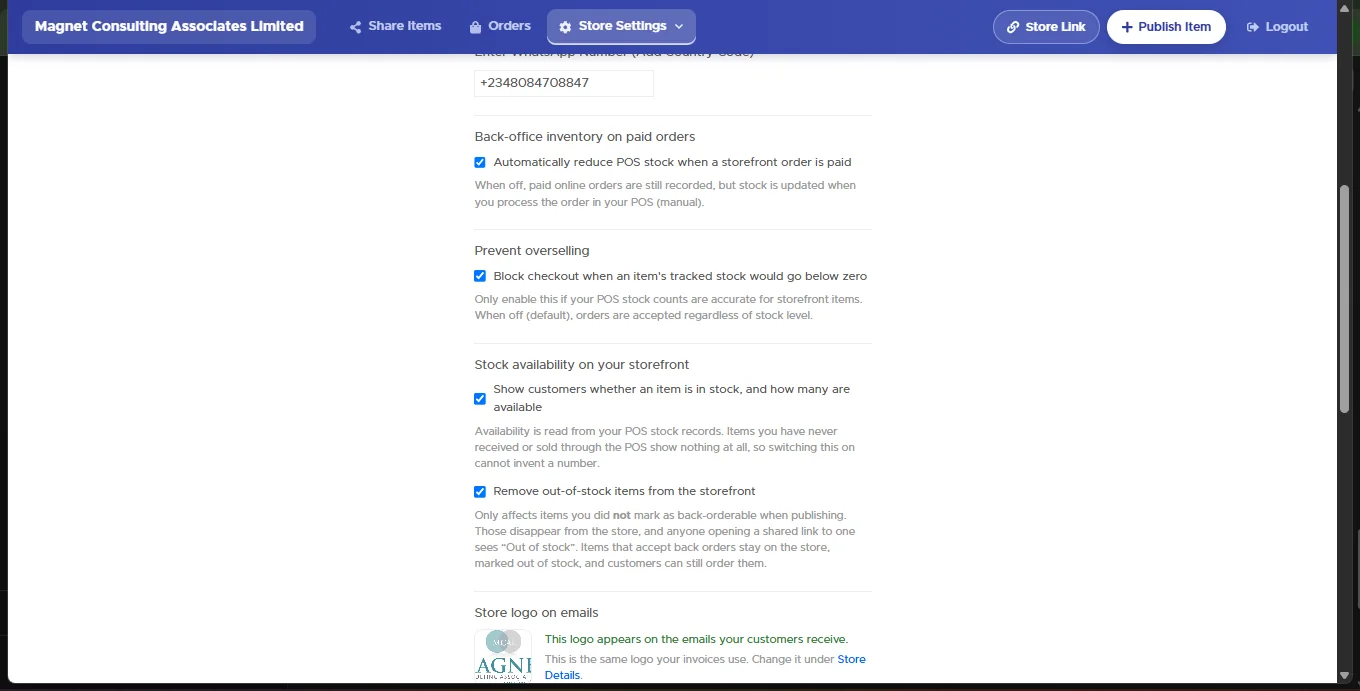
| Setting | What it does | Turn it on when… |
|---|---|---|
| Back-office inventory on paid orders Automatically reduce POS stock when a storefront order is paid | A paid online order takes the stock out of your POS automatically. With it off, the order is still recorded but you adjust stock yourself when you process it. | You want online and shop-floor stock to stay in step without manual work. |
| Prevent overselling Block checkout when an item's tracked stock would go below zero | Refuses the sale rather than letting a customer buy what you don't have. | Only when your POS counts are genuinely accurate for the items you sell online. Off by default — with it off, orders are accepted regardless of stock level. |
| Show customers whether an item is in stock, and how many are available | Puts "In stock · N available" or "Out of stock" on each item. | Your quantities are trustworthy. Availability is read from your POS records — items you have never received or sold through the POS show nothing at all, so this cannot invent a number. |
| Remove out-of-stock items from the storefront | Hides sold-out products from the store. Anyone opening a shared link to one sees "Out of stock". | You'd rather not show what you can't supply. Note it only affects items you did not mark as back-orderable — see section 6. |
2.5 The "Back in stock" message
Further down Setup you'll find the "Back in stock" SMS message — the text sent automatically to a customer whose back-ordered item returns to stock. Leave it blank to use the standard message, or write your own using the tokens shown beneath the box: {item}, {order}, {qty}, {store}, {whatsapp}, {link}. Then Save message (or Use standard message to go back).
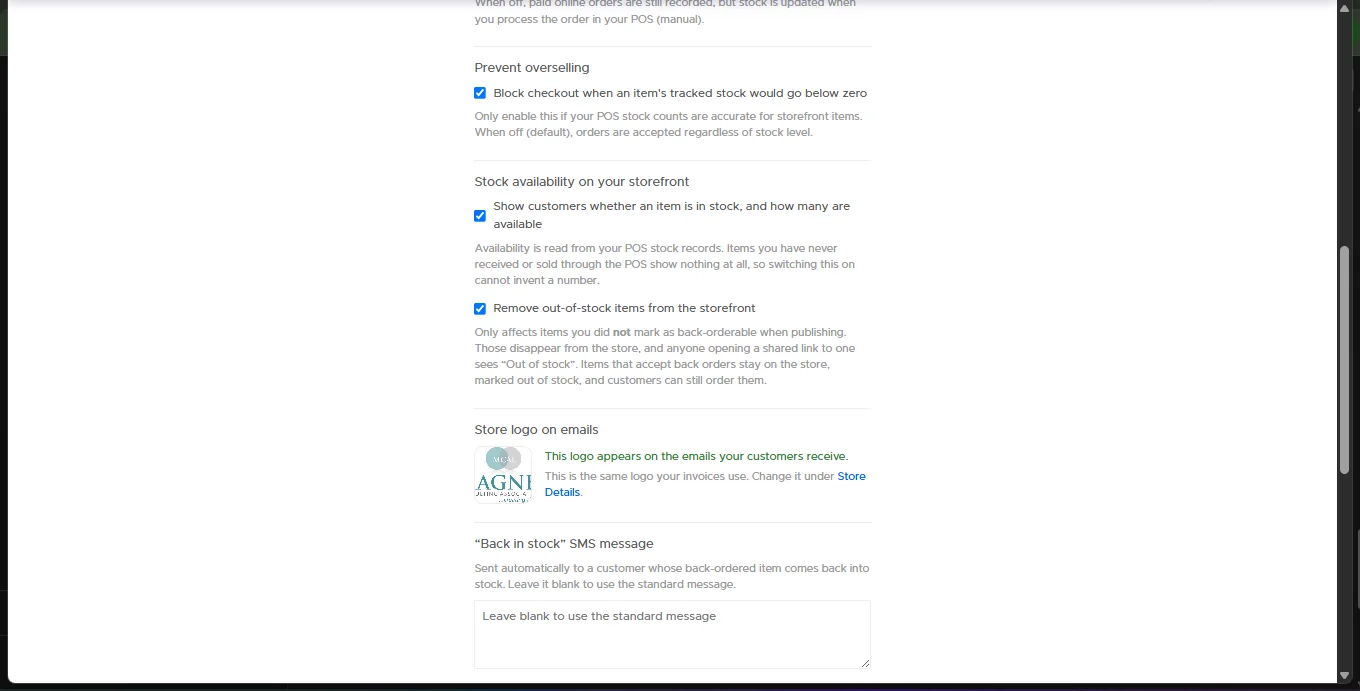
The same page also carries Store logo on emails (the logo customers see on your emails — it's the one from Store Details), Customer reviews, Online store status, and Invoice Conversion Payment Type (the payment type used when an order becomes an invoice).
3. Item categories
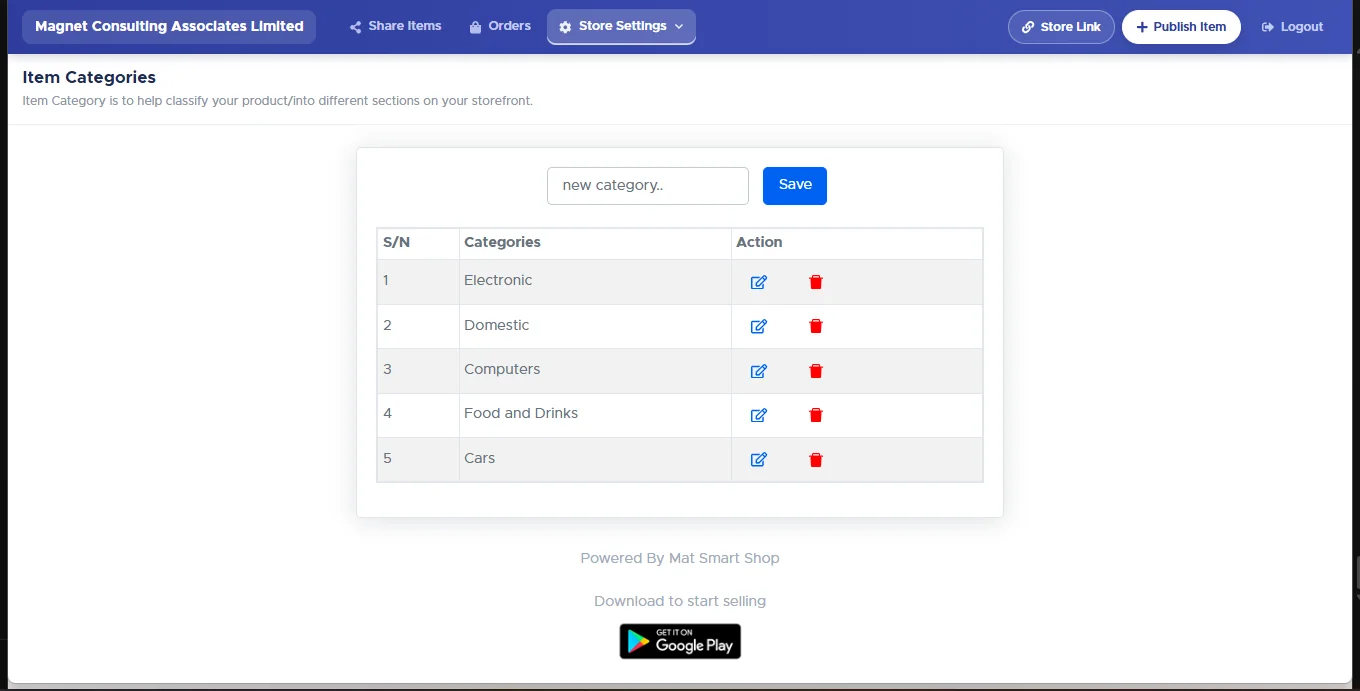
Store Settings → Item Categories. Categories are the sections customers filter by on your storefront. Type a name, click Save, and it joins the list; use the pencil to rename and the bin to remove.
4. Delivery fees
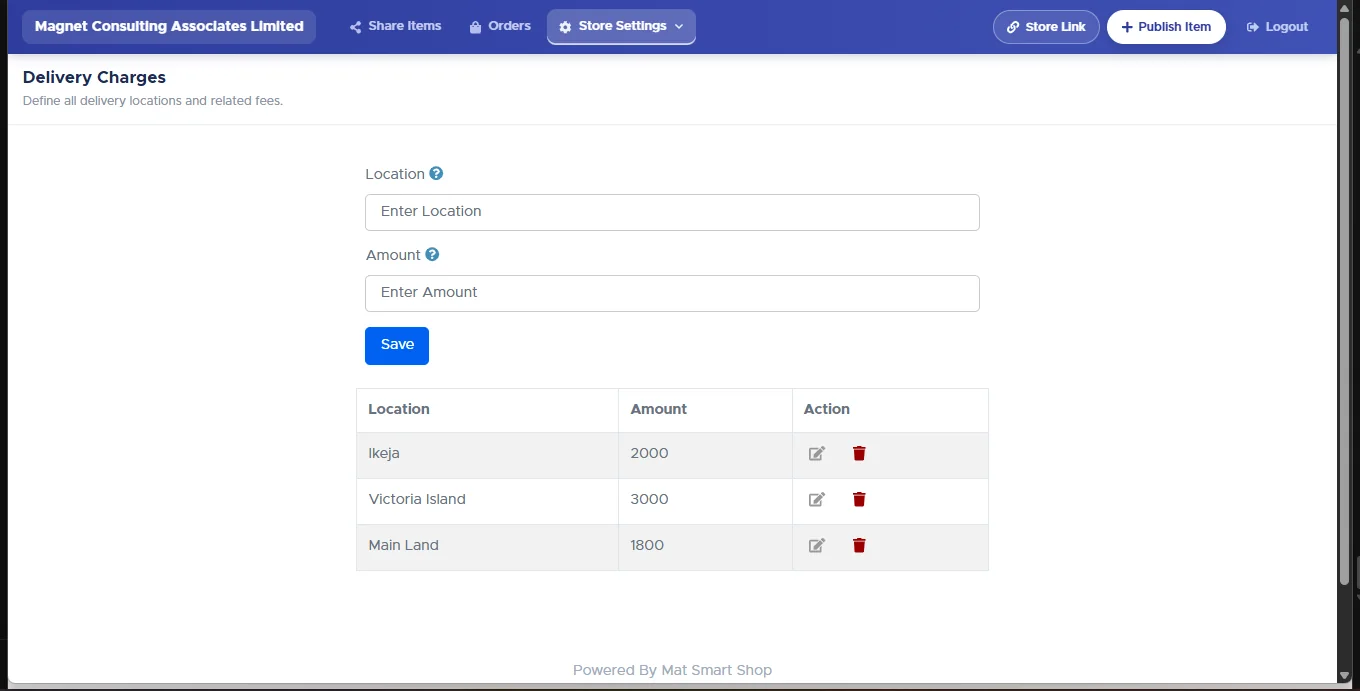
Store Settings → Delivery Fees. Enter a Location and an Amount, then Save. Customers pick their location at checkout and the matching fee is added to the order automatically.
5. Publishing items
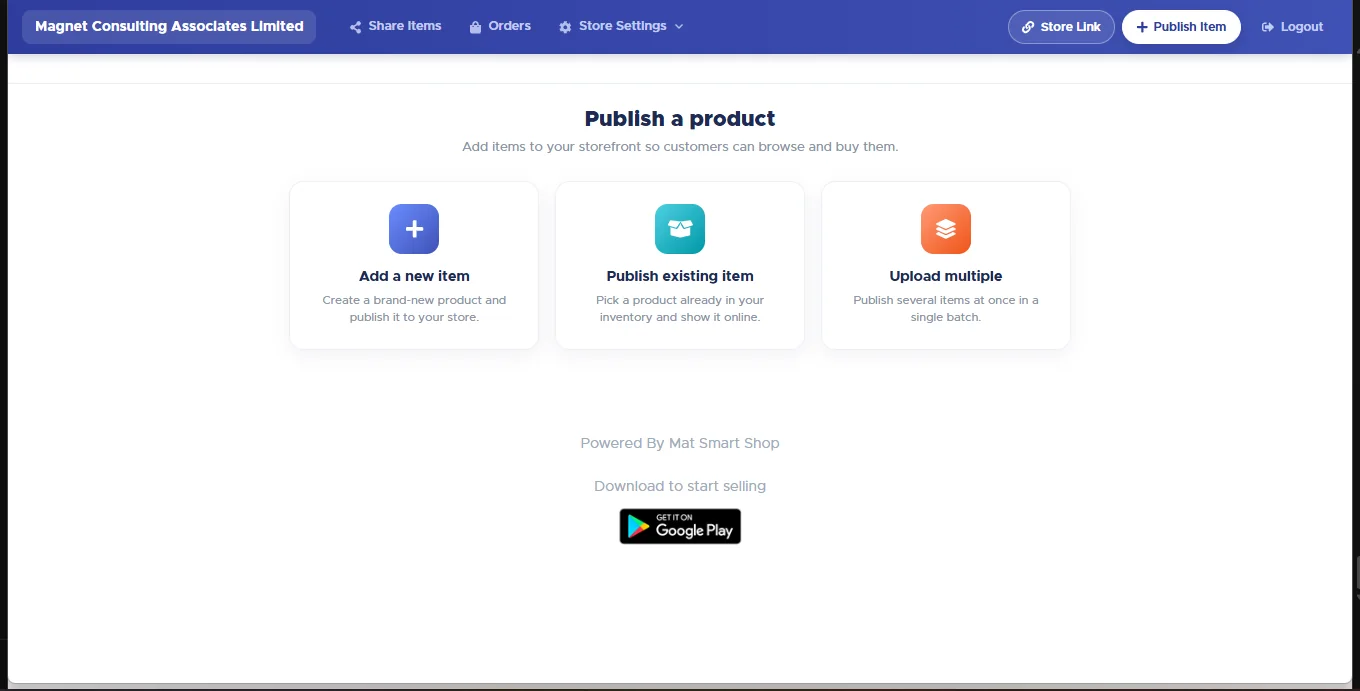
Click Publish Item. There are three routes, and which one you want depends on where the product currently lives.
| Route | Use it when | What happens |
|---|---|---|
| Add a new item | The product isn't in your catalogue at all. | A short form asks for Item name, Item type, Purchase rate and Sales rate — then you land on the storefront details form. |
| Publish existing item | It's already in your POS item list. | Pick it by name and click Continue. Nothing is re-typed — you're only adding the storefront details. |
| Upload multiple | You're putting many products online in one sitting. | Opens a grid where you set everything for every item and save once. |
5.1 The item details form
Whichever route you took, you finish on the same form.
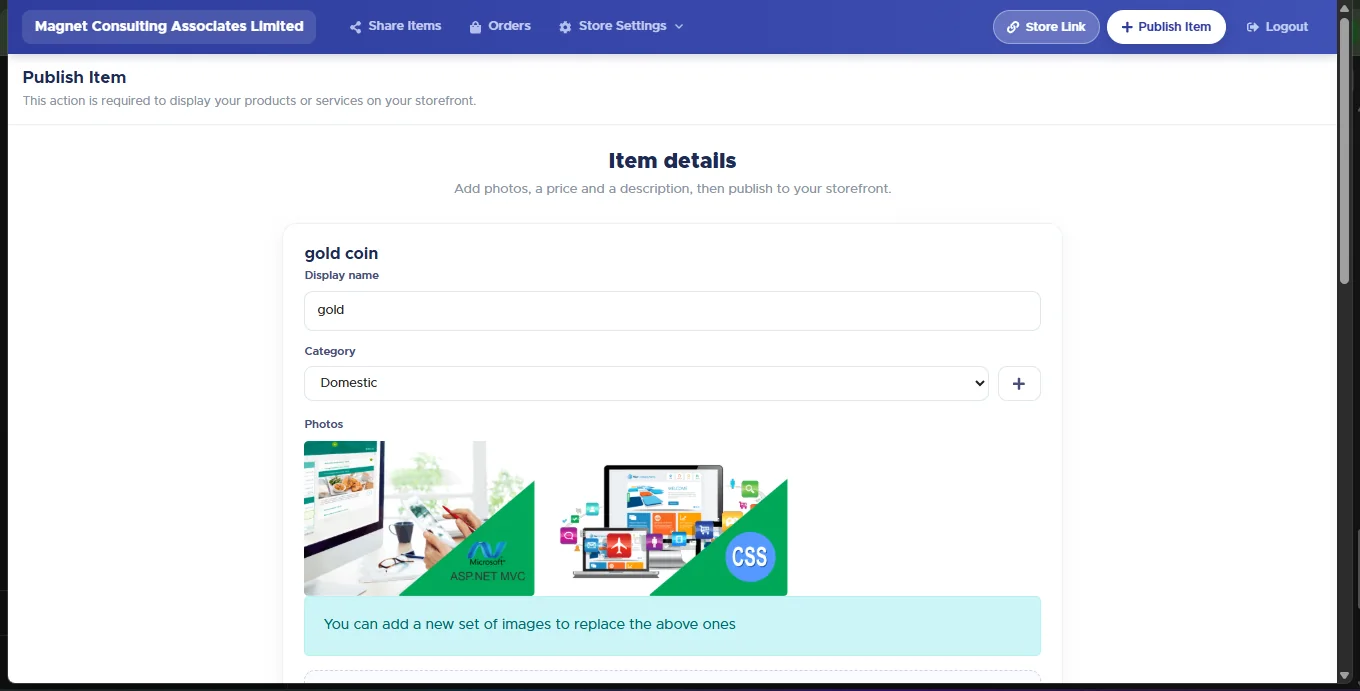
- Display name — the name customers will see. It can differ from your internal item name (here an item called gold coin is sold online as gold).
- Category — pick one, or use + to create one without leaving the form.
- Photos — drag and drop onto the upload area or click Select files. If the item already has photos, a new set replaces them. Photos are served from a fast image CDN, so they load quickly wherever a customer opens your link.
- Description — a line or two of selling copy.
- Display item price — untick to show the product without a price (useful for "call for price" lines).
- Price and Percentage off (%) — the discount shows as a badge on the card and strikes through the old price.
5.2 Tell your customers, at the moment you publish
At the bottom of the form sits a Tell your customers section — the quickest way to announce a new product.
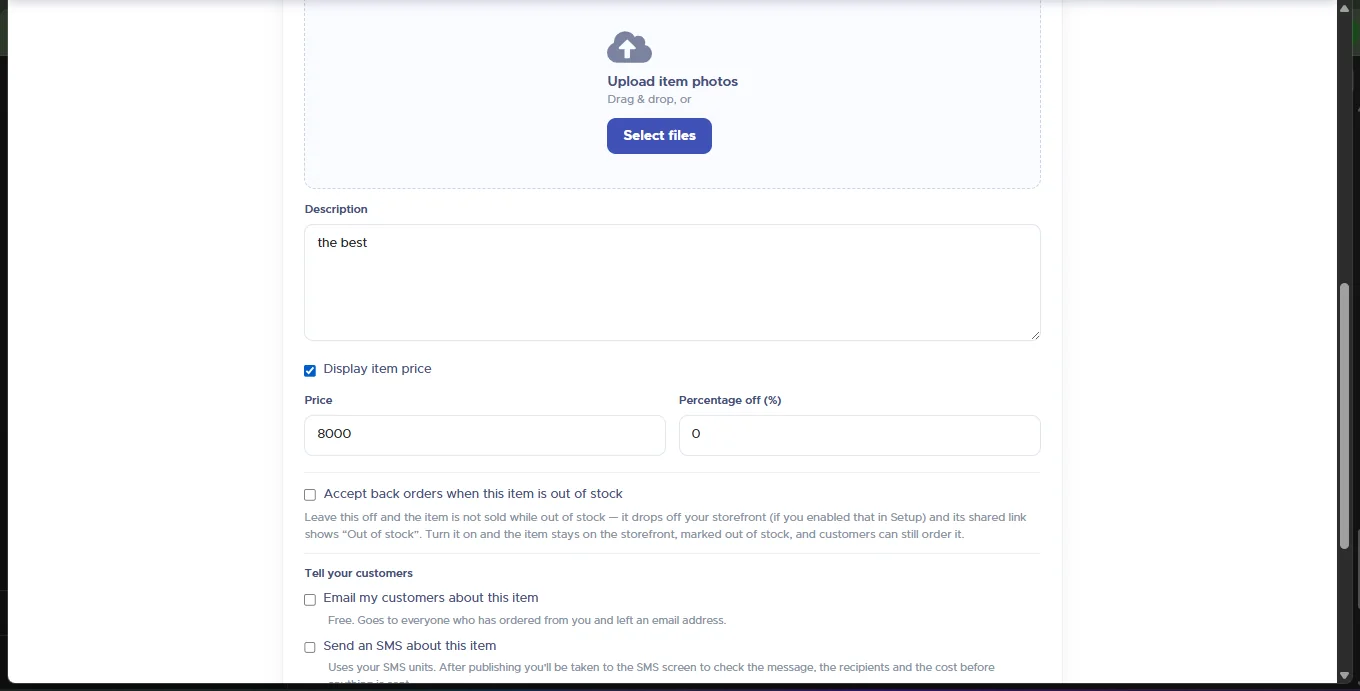
- Email my customers about this item — free. Goes to everyone who has ordered from you and left an email address.
- Send an SMS about this item — uses your SMS units. After publishing you're taken to the SMS screen to check the message, the recipients and the cost before anything is sent (see section 9).
5.3 Publishing many at once
Upload multiple opens a spreadsheet-style grid: one row per product, with Display name, Category, Sales rate, Display price, tick-boxes for Make item searchable?, Prescription based? and Online ordering?, plus Description and Upload image per row. Set what you need and click Save changes once.
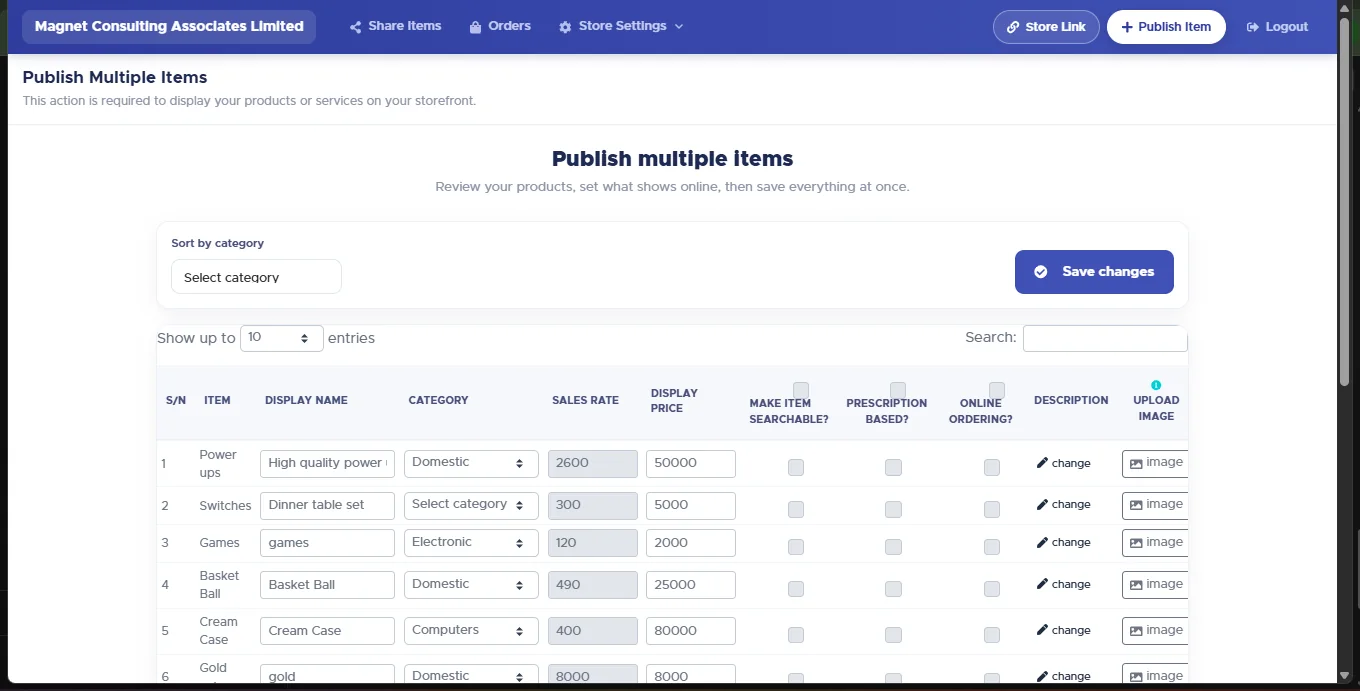
The column tick-boxes have headers you can tick to apply down the whole column, which is the fastest way to switch online ordering on for everything.
6. Back-order setup
A back order lets a customer buy something you've run out of, on the understanding it ships when you restock. This is set per item, not per store — the store-level settings in section 2.4 only decide how a sold-out item is displayed.
On the item form, tick Accept back orders when this item is out of stock, then set Minimum days to fulfil a back order (e.g. 7) so the customer is told how long they'll wait.
| Item is out of stock and… | "Remove out-of-stock items" is OFF | "Remove out-of-stock items" is ON |
|---|---|---|
| Back orders NOT accepted | Stays on the storefront, marked out of stock. Cannot be bought. | Disappears from the storefront. Anyone opening a shared link to it sees "Out of stock". |
| Back orders accepted | Stays on the storefront, marked out of stock — customers can still order it. | Still stays on the storefront, marked out of stock — customers can still order it. The removal setting does not apply to back-orderable items. |
Every customer who back-orders is queued for an automatic text the moment your stock records show the item is available again. That queue is section 11.
7. Sharing your store link
Click Store Link in the top bar. The Copy Store Link box shows your storefront address — a readable slug built from your store name, not a string of numbers — with a Copy button.
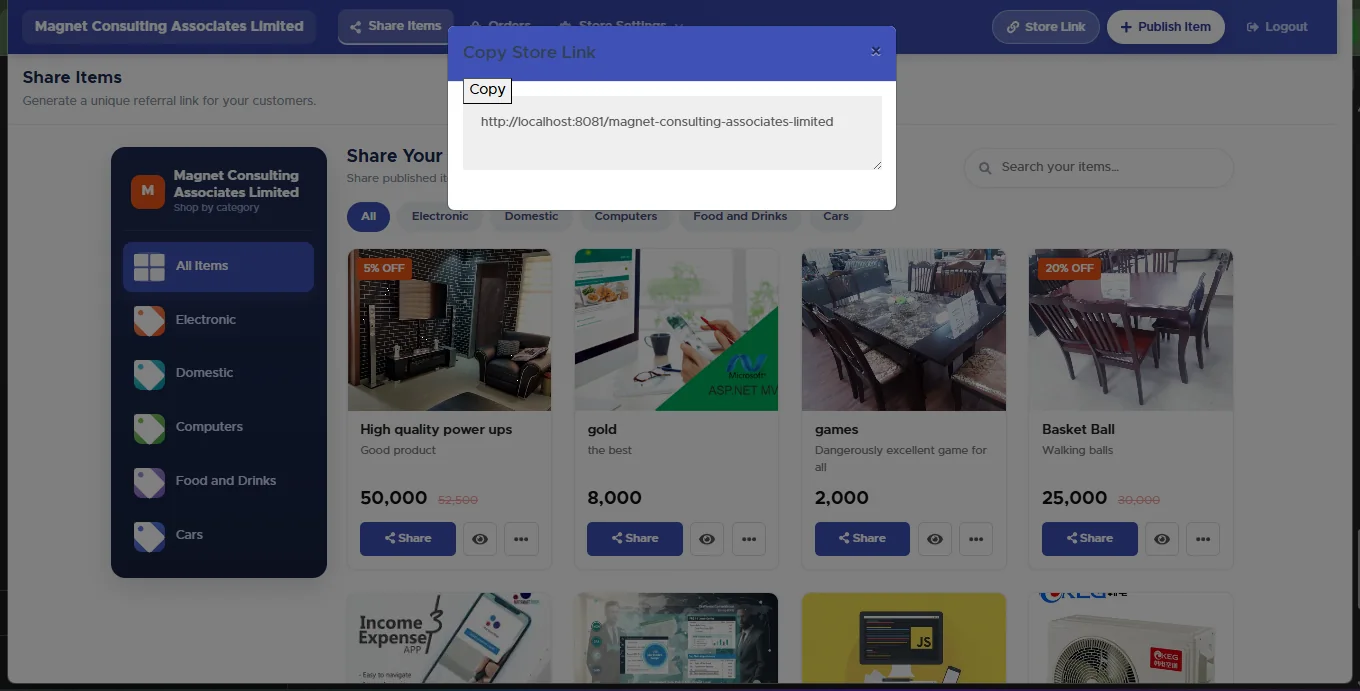
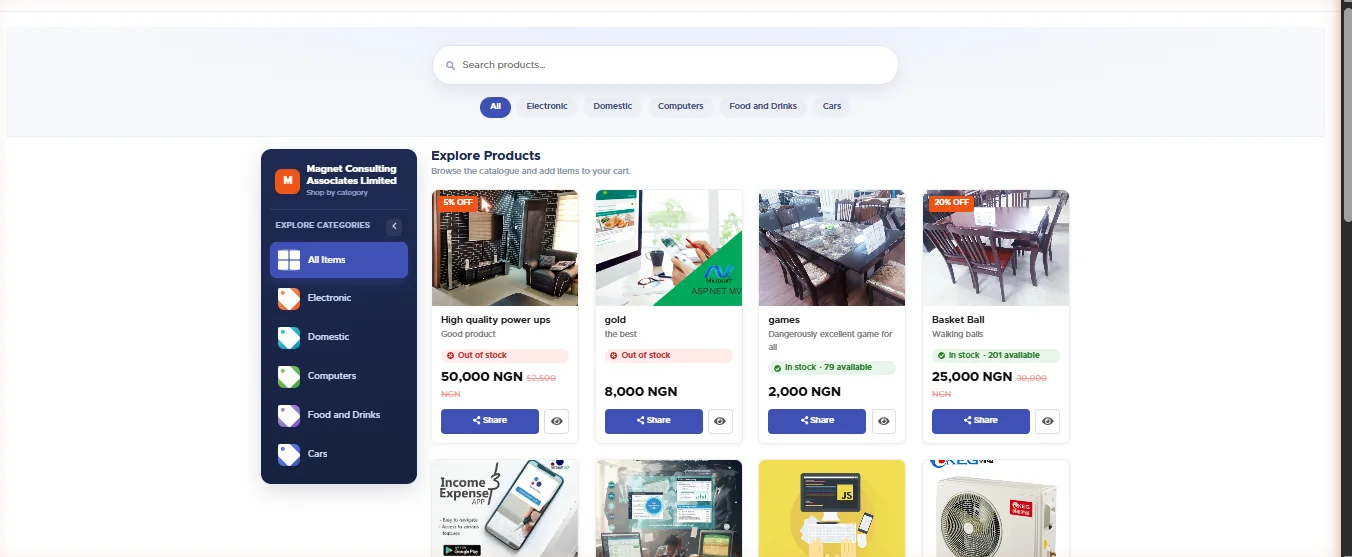
Paste it into your WhatsApp status, your bio, a broadcast, a flyer — anywhere. It opens the full catalogue:
8. Sharing a single item
The store link sends someone to your whole catalogue. Often you want the opposite — one product, straight to one customer ("here's that bag you asked about"). Open Share Items.
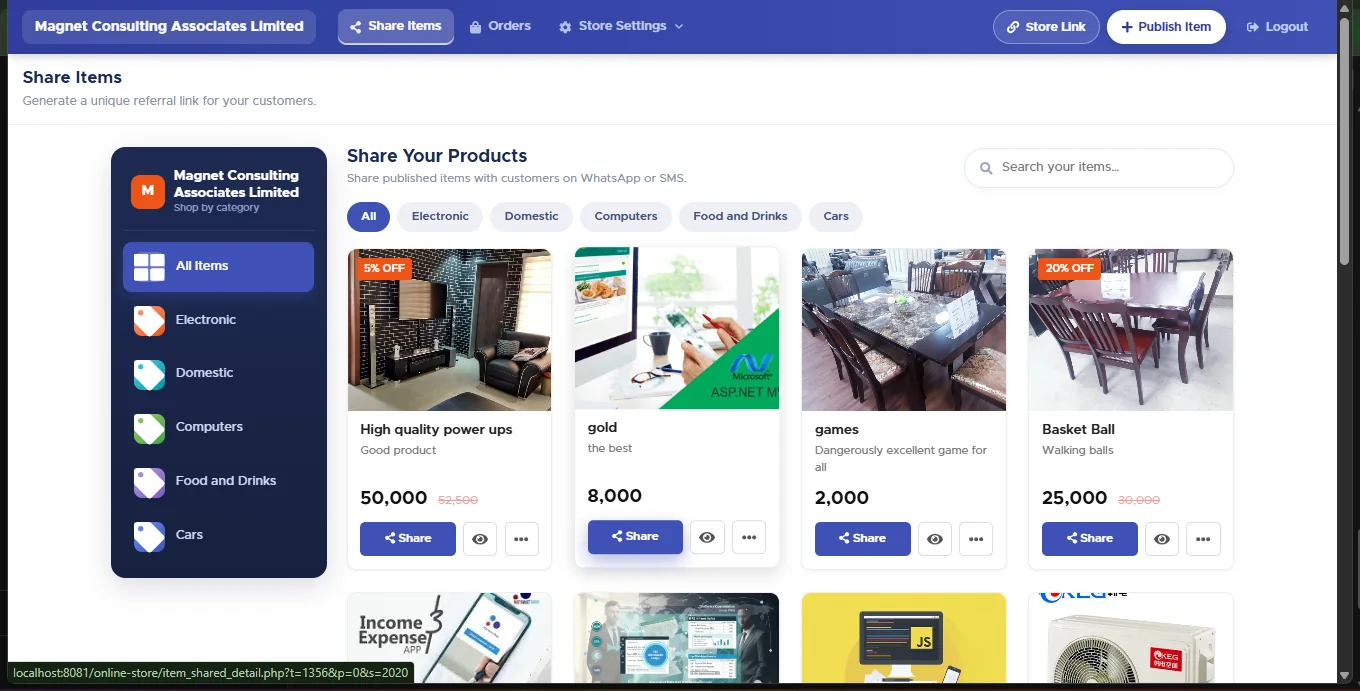
Each card carries three controls:
- Share — the main button. Opens the share box below.
- 👁 (eye) — view the item exactly as a customer sees it.
- ⋯ — more actions.
8.1 Share on WhatsApp
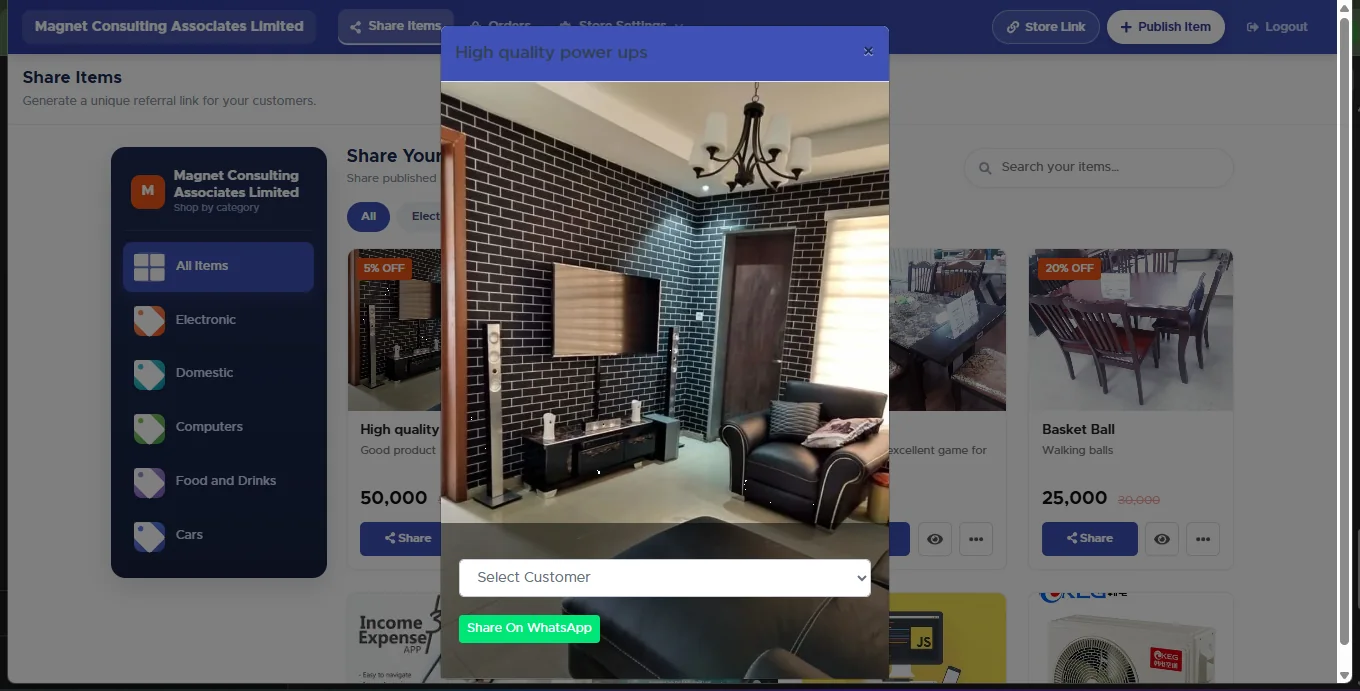
Share opens a box with the product photo, a Select Customer drop-down and Share On WhatsApp. Pick the customer, then click the green button — WhatsApp opens with the message and the item link ready to send to that person.
8.2 The ⋯ menu
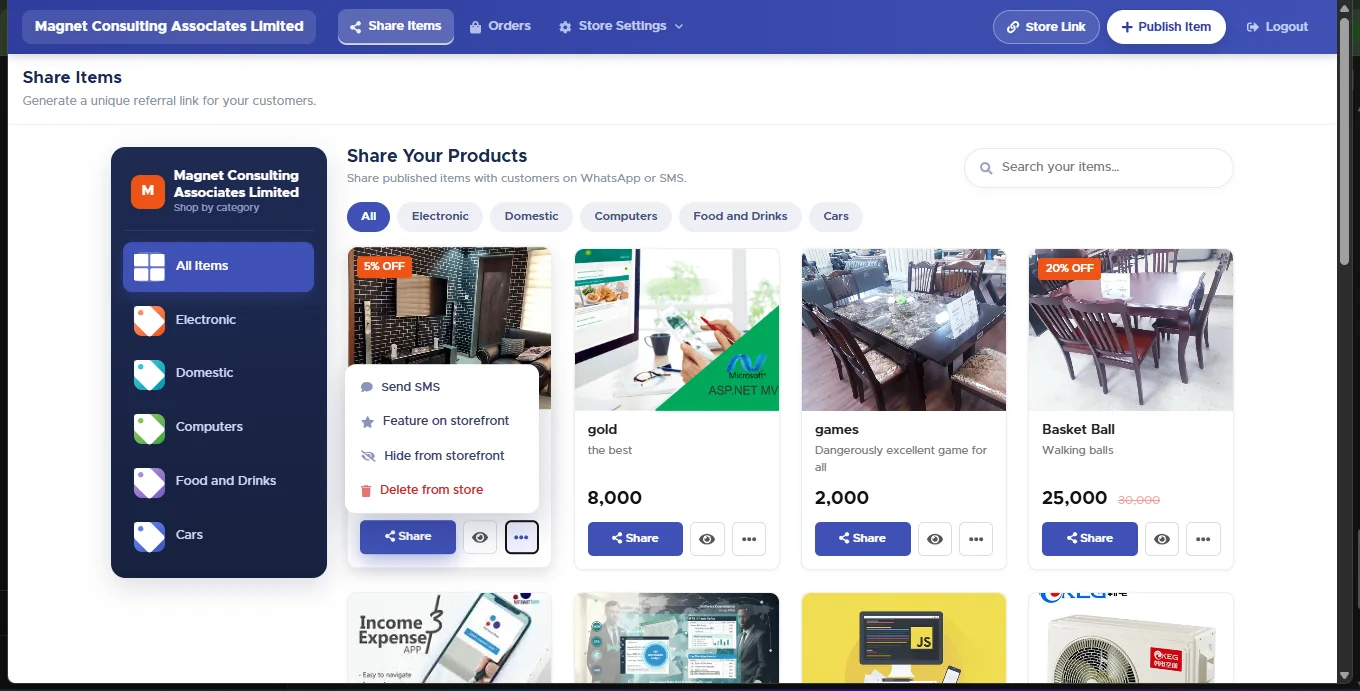
| Action | What it does |
|---|---|
| Send SMS | Opens the SMS screen with this product already loaded — section 9. |
| Feature on storefront | Pushes the item to the front of your store. Toggles to Remove from featured. |
| Hide from storefront | Takes it off the store without deleting it. The card keeps a Hidden badge and the action becomes Show on storefront. |
| Delete from store | Removes the item from your storefront for good. |
9. Sending an item to customers by SMS
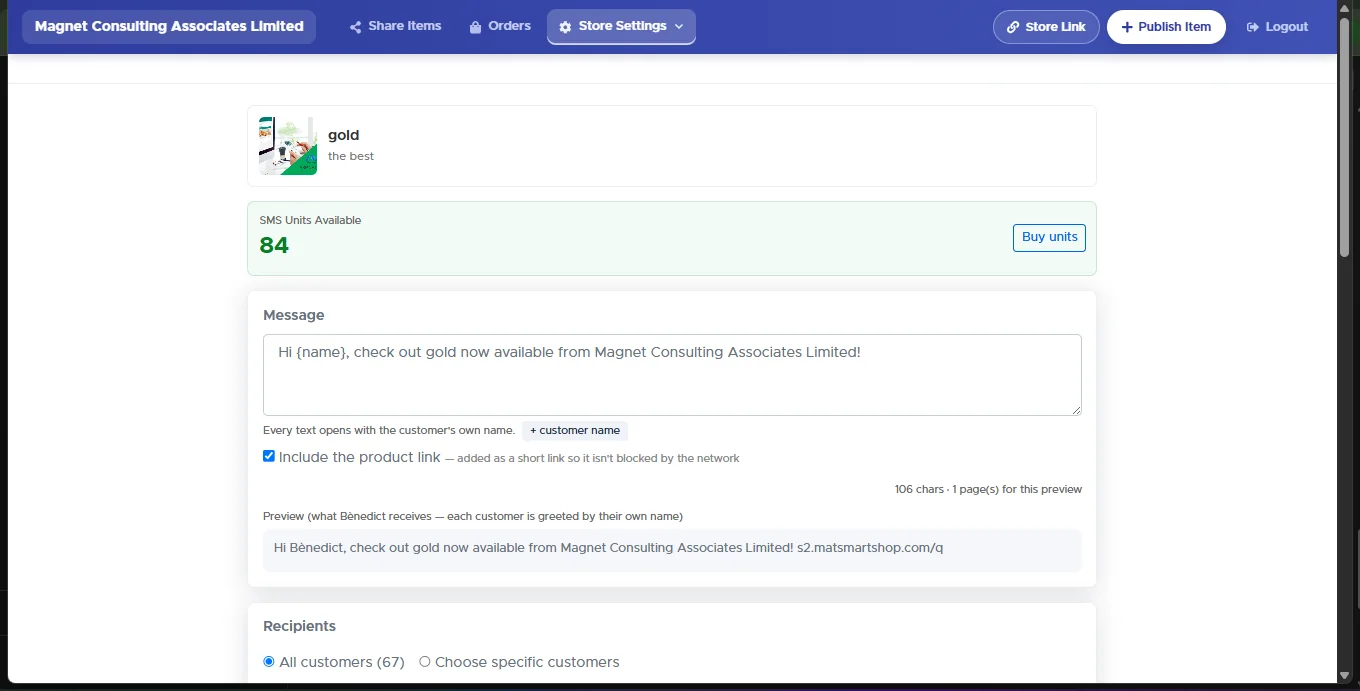
Working down the screen:
- The product is shown at the top so you can confirm you're promoting the right thing.
- SMS Units Available with a Buy units button — you can top up without losing the message you've written.
- Message — a sensible promotional line is pre-filled. Every text opens with the customer's own name automatically, even if you never type a greeting; the + customer name button inserts the
{name}token if you want it mid-sentence. - Include the product link — on by default. The link is added as a short link so networks don't block it.
- A live character and page count ("106 chars · 1 page(s) for this preview") tells you what each recipient will cost before you commit.
- Preview shows the exact text one real customer will receive, greeted by their own name.
- Recipients — All customers or Choose specific customers. Beneath it you get the arithmetic: recipients, units in total, and whether your balance covers it.
- Also reach customers on DND — customers who registered their number as Do-Not-Disturb are skipped by default, because their network blocks ordinary SMS. Ticking this routes them through the corporate route, which costs more per page. Worth it for something genuinely time-sensitive.
10. Order management
When an order comes in you get an alert. Open Orders.
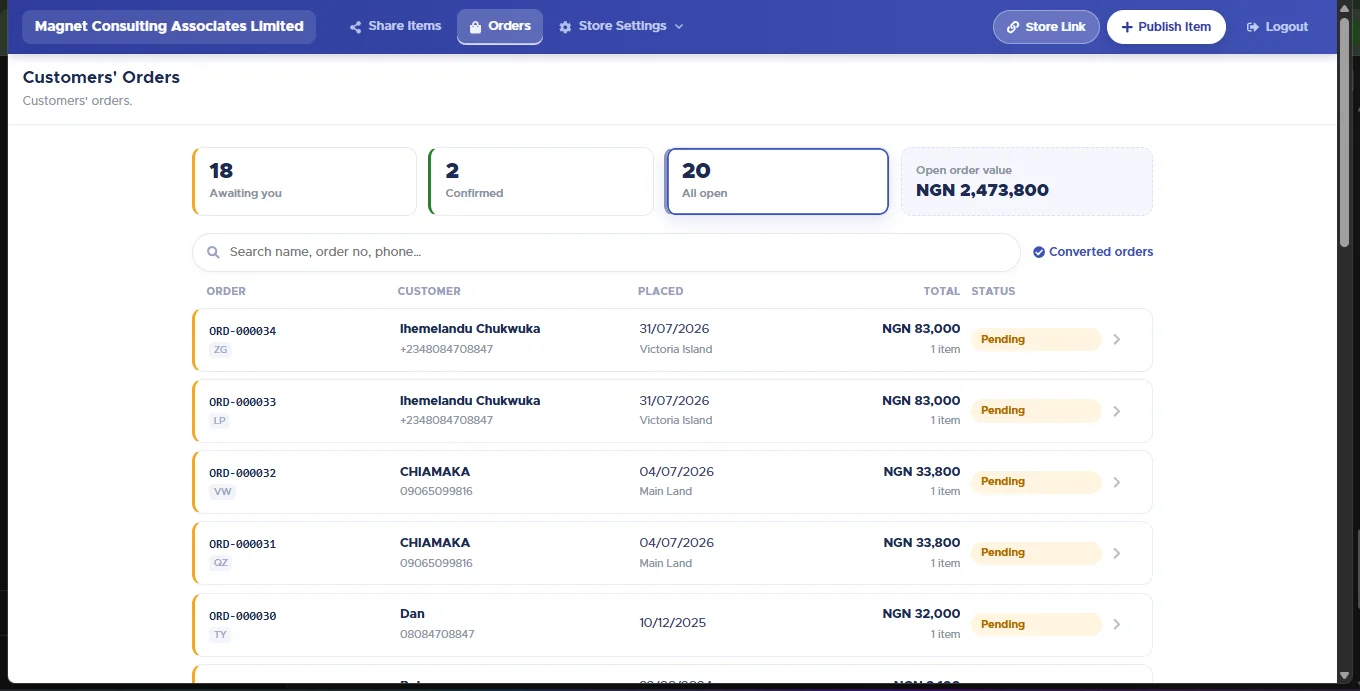
- Awaiting you, Confirmed, All open and Open order value sit across the top. Click one to filter the list.
- Search name, order no, phone… finds a specific order fast.
- Converted orders shows the ones already turned into invoices.
- Every order carries a sequential number like ORD-000034, allocated the moment it's placed, so you and the customer are always talking about the same order.
10.1 Working an order
Click any row to open it.
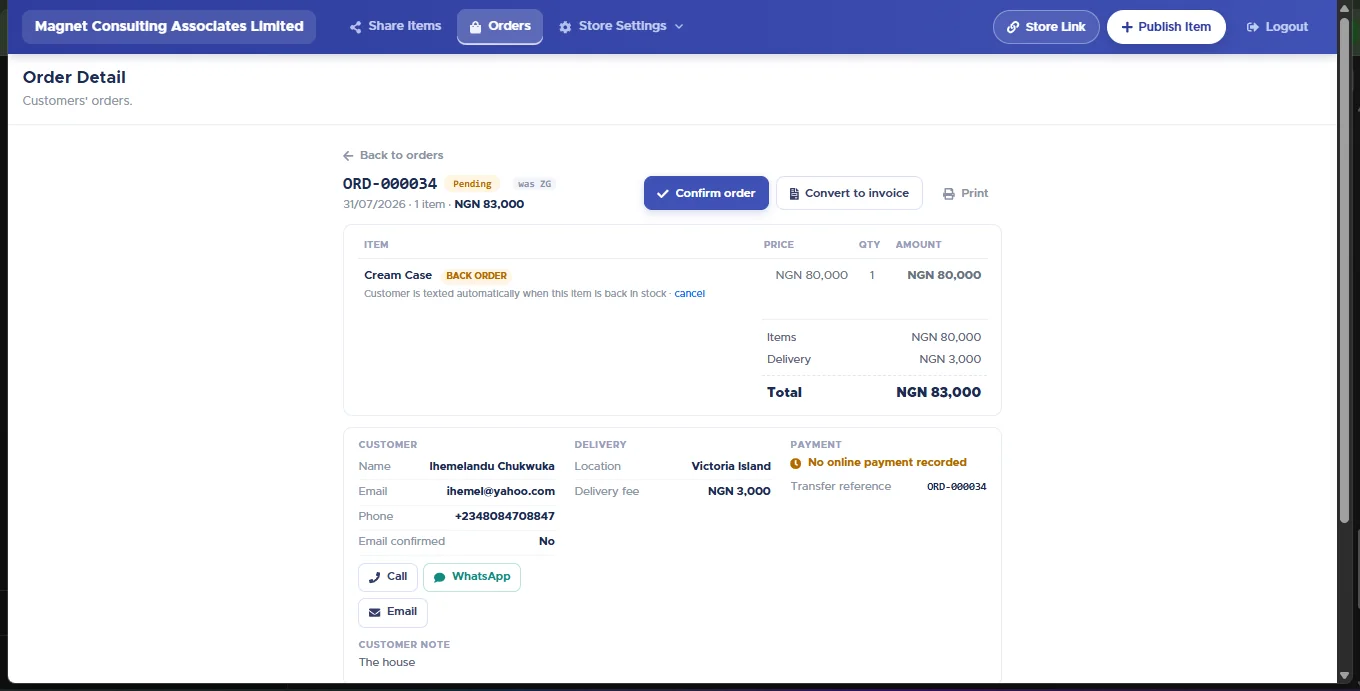
- Confirm order — accepts it. The status moves from Pending to Confirmed.
- Convert to invoice — creates the invoice under Sales & Customers so you can fulfil and get paid through your normal flow. You're asked how it was paid and for the amount, and you can add a payment type on the spot.
- Print — a printable copy of the order.
- Items, Delivery and Total are itemised, with the delivery fee taken from the location the customer chose.
- The customer block gives you name, email, phone, whether the email was confirmed, and one-click Call, WhatsApp and Email buttons. Any customer note appears underneath.
- Payment tells you plainly whether money has arrived — e.g. No online payment recorded — alongside the transfer reference the customer was given.
A line the customer back-ordered is badged BACK ORDER, with the reassurance underneath: "Customer is texted automatically when this item is back in stock" — and a cancel link if you'd rather that text didn't go.
11. Back-order SMS reminders
Store Settings → Back-order Notifications. This is the queue of customers waiting on something you've run out of. Nothing here needs chasing: each person is texted automatically as soon as your stock records show the item is available again.
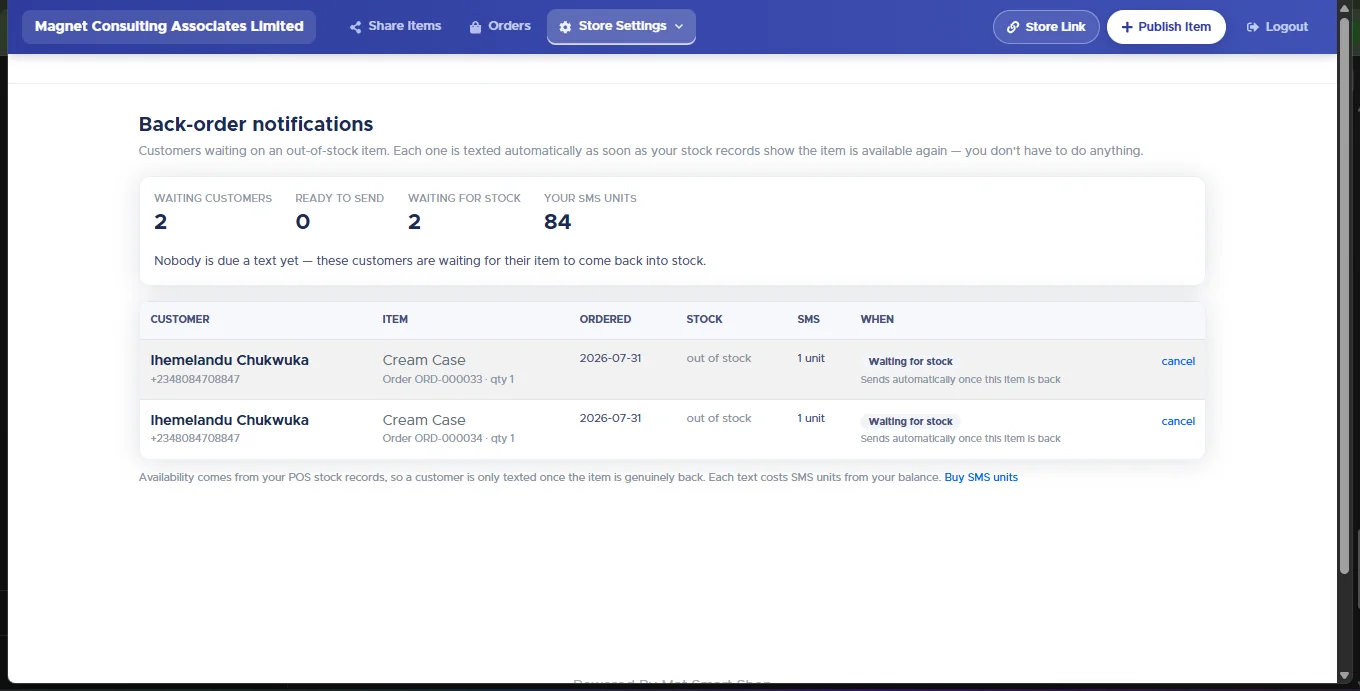
Four counters run across the top:
| Counter | Meaning |
|---|---|
| Waiting customers | Everyone currently queued for a restock text. |
| Ready to send | Their item is back — these go at the next run. |
| Waiting for stock | The item still isn't in. Nothing will be sent yet. |
| Your SMS units | Your balance, with a Buy SMS units link. |
Each row shows the customer and phone number, the item, the order number and quantity, current stock, what the text will cost, and its status. Use cancel to drop someone from the queue before the text goes out.
12. SMS units and your sender name
Store Settings → Buy SMS Unit. Everything the storefront sends by text — item promotions, restock alerts — draws on this balance.
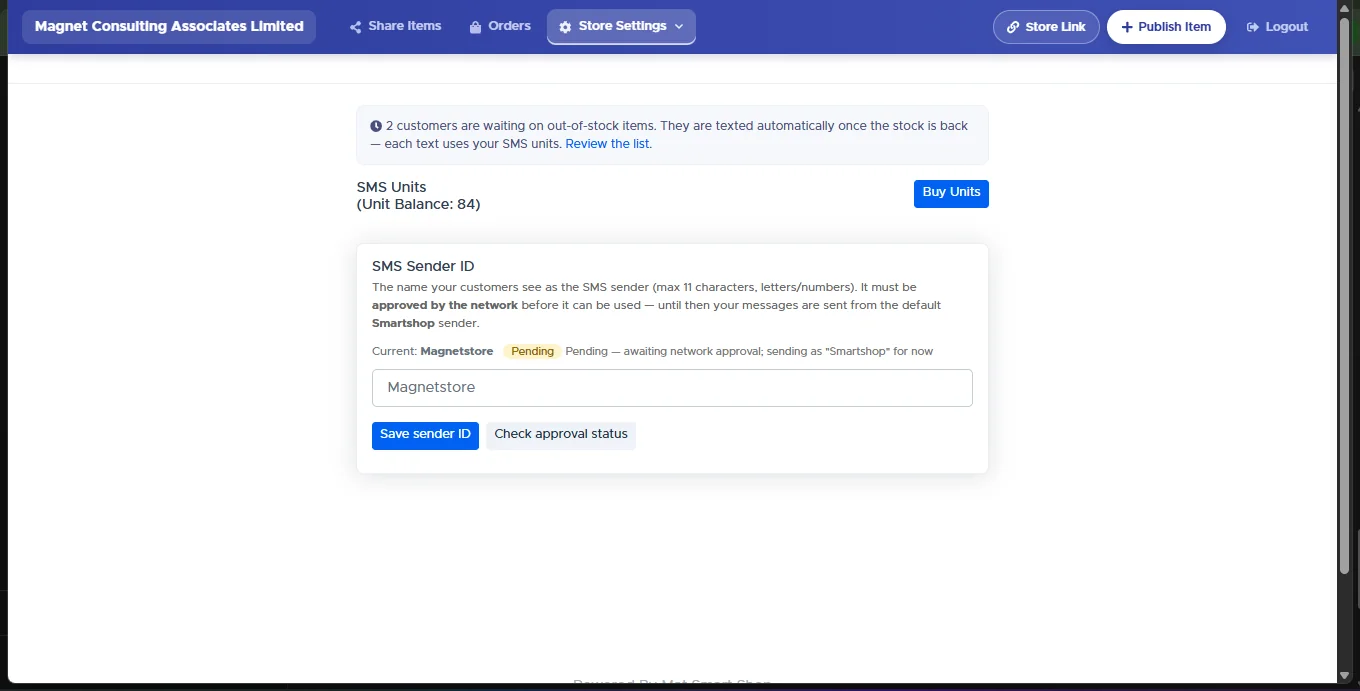
- A banner at the top warns you if customers are already queued for restock texts, with a Review the list link straight to section 11's screen.
- SMS Units (Unit Balance) and Buy Units — top up here.
- SMS Sender ID — the name customers see as the sender, maximum 11 characters, letters and numbers only. It must be approved by the network before it can be used; until then your messages go out from the default Smartshop sender. Enter your name, Save sender ID, and use Check approval status to see where it's got to.
Wallet (Store Settings → Wallet) holds your account balance for these purchases.
13. Quick reference
| I want to… | Go to |
|---|---|
| Connect card/transfer payments | Store Settings → Setup → Online Payment |
| Set where I deliver and for how much | Store Settings → Delivery Fees |
| Stop customers buying what I haven't got | Store Settings → Setup → Prevent overselling |
| Show stock counts to shoppers | Store Settings → Setup → Stock availability |
| Put a product online | Publish Item |
| Let customers order a sold-out item | The item's publish form → Accept back orders |
| Send someone my whole catalogue | Store Link → Copy |
| Send someone one product | Share Items → Share → pick customer → Share On WhatsApp |
| Text all my customers about a product | Share Items → ⋯ → Send SMS |
| Take a product down temporarily | Share Items → ⋯ → Hide from storefront |
| Accept an order and bill it | Orders → open it → Confirm order → Convert to invoice |
| See who's waiting on a restock | Store Settings → Back-order Notifications |
| Top up texts / change my sender name | Store Settings → Buy SMS Unit |
If something isn't behaving
- The SMS screen says "No product selected." You opened it from the menu. Go via Share Items → ⋯ → Send SMS on a specific product.
- A sold-out item vanished from the store. That's Remove out-of-stock items in Setup. Mark the item back-orderable and it stays put.
- Stock counts look wrong online. They're read from your POS records, not typed in here. Fix the item's stock in the main app and the storefront follows.
- Restock texts aren't going out. Check your SMS unit balance — an empty balance holds the queue rather than dropping it.
- Texts arrive from "Smartshop", not my store name. Your Sender ID is still awaiting network approval. Check its status on the Buy SMS Unit screen.