Store Setup, Users & Security
Creating your store, making it yours, bringing in your team — and knowing exactly who can do what, from where.
Creating your store and signing in, start to finish, in about a minute.
This guide is for the owner (the admin account that created the store) and anyone they trust to run the back office. It covers everything under ACCOUNT → Settings in the left menu, the Profile Settings page, and the sign-up and sign-in screens every user meets.
1. Creating a store
Go to the MAT Smart Shop website and choose Create a Store on the sign-in page. Registration has two short pages.
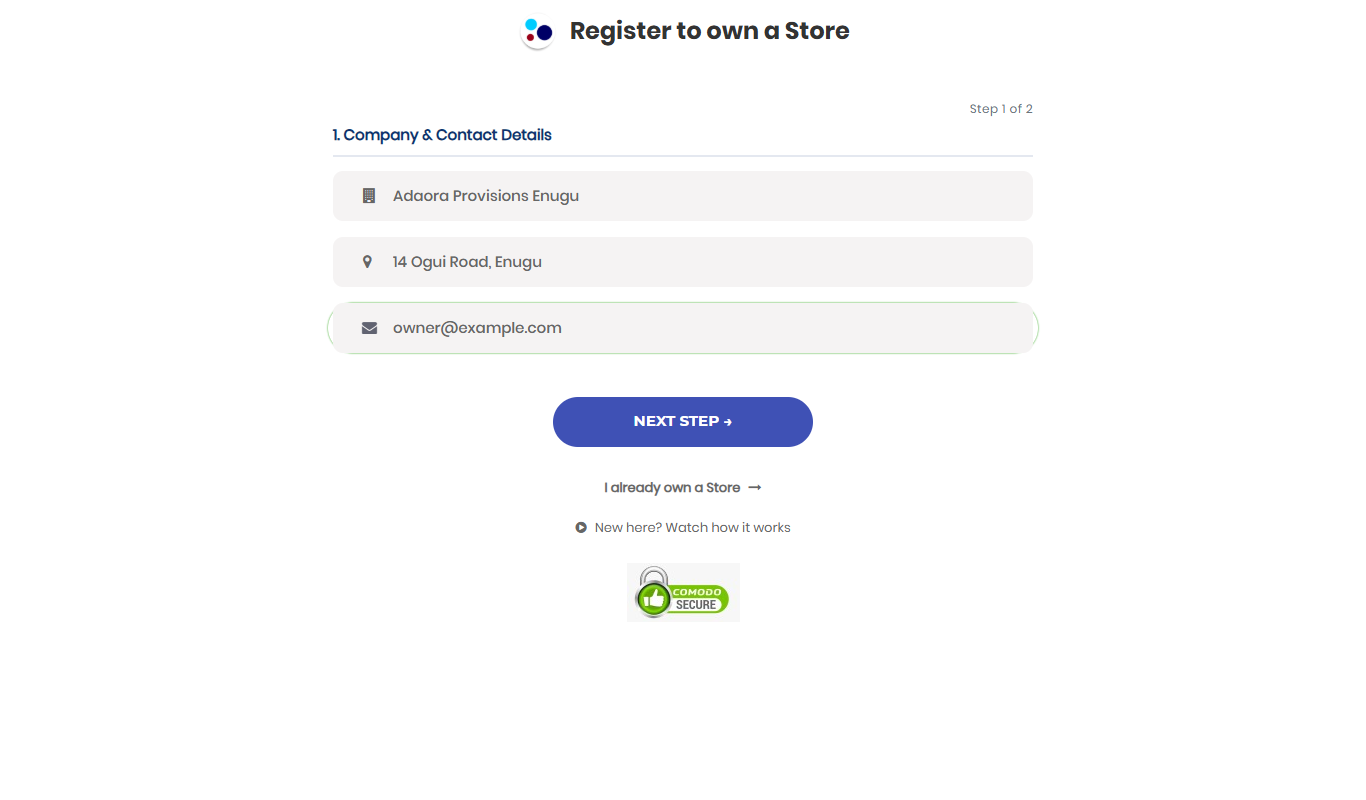
1.1 Page 1 — Company & Contact Details
| Field | Rules |
|---|---|
| Company / Store Name | At least 2 characters. Must be unique across MAT Smart Shop — if another business already uses it, you'll be asked to choose another (add your town: "Adaora Provisions Enugu"). |
| Business Address | At least 6 characters. Printed on your invoices. |
| Business Email Address | Your sign-in for ever after, and where every system email goes. Use an address you check daily and will keep — not a staff member's personal inbox. |
When you continue, the system checks the email in the background:
| If the email is… | What happens |
|---|---|
| New to MAT Smart Shop | Page 2 opens — carry on. |
| Already registered but not verified | Check Your Email: a fresh verification link is sent. Click it, then sign in. (Or choose Change email.) |
| Already registered and verified | Account Found: your existing store(s) are listed. Sign in to one of them, or choose Create a New Store Under This Account (section 5). |
1.2 Page 2 — Personal & Security Details
- First Name, Last Name, and an optional Phone Number.
- Country, then State / Region. The Currency fills itself in from the country (Nigeria → NGN). It is the currency every amount in your store is shown in.
- Password (at least 6 characters) and Repeat Password.
- Agent code (optional) — if a MAT Smart Shop agent signed you up, enter their code so they're credited. If you arrived through an agent's link, it's filled in already and a banner names the agent; Not me clears it.
Press Create My Store. After a few seconds you'll see 🎉 Your shop is ready! — the store is created with sensible defaults (a Cash payment type, a walk-in Cash customer, a Cash vendor for small expenses, and the WEB sales point). Continue asks how you want to work: Continue With Web Version, Continue On Mobile (Android), or Download the desktop version.
A new store starts on the Freemium plan. See the Usage, Billing & Help guide for what's included and how to upgrade. If a friend invited you, open their invite link before registering so both of you receive the invite reward.
2. Confirming your email
A verification email is sent as soon as you register. Click the button in it. Until you do:
- A yellow banner across the top of the website reads "Your email is not verified, Please click HERE to verify your email" — clicking HERE resends the link.
- You can't add a second store to the account, and you can't take the online storefront live.
3. Signing in — the two steps
3.1 Step 1: who you are
Enter your email (or username) and password, then Sign in. Possible messages:
| Message | Meaning |
|---|---|
| Invalid login credentials. | Wrong email or password. Check Caps Lock; use Reset Password if needed. |
| Account is inactive. Contact system administrator. | The owner has de-activated this staff account (section 11). |
3.2 Step 2: where you are — Select Sales Point
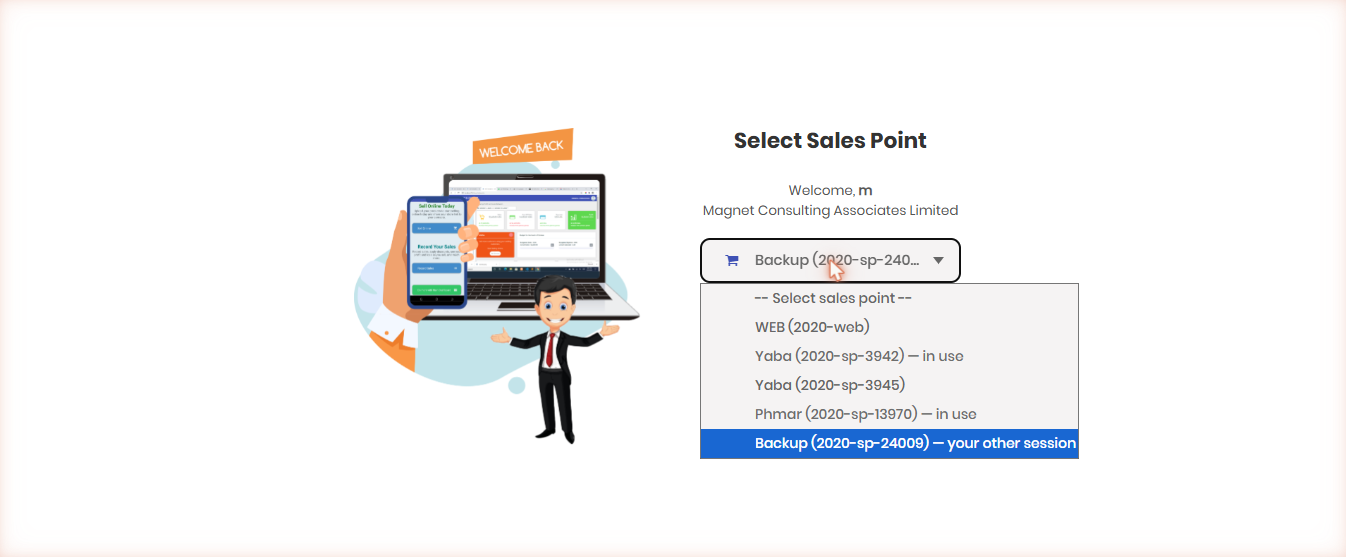
Every website sign-in is made at a sales point. Pick yours and press Continue. Each entry is labelled:
| Label | Meaning |
|---|---|
| WEB (code) | The shared web point. Always available to everyone; never locked to one browser. |
| Yaba (code) | A free till — pick it and it becomes yours for this session. |
| — yours | This browser already holds it. Pre-selected. |
| — your other session | You're signed in on it from another browser; you can carry on here. |
| — in use (greyed out) | Held by another device or person. Can't be taken from here. |
- If every till is in use you're placed on WEB, with a note that an admin can free a till under Settings → Sales Points.
- If a till is grabbed in the moment between your choosing and continuing, you'll be asked to pick another.
- Use a different account takes you back to step 1.
Every successful sign-in is recorded in the Login Audit (section 14).
4. Forgotten and changed passwords
| Situation | What to do |
|---|---|
| Forgot your password | Sign-in page → Reset Password? → enter your email → RESET. A new password is emailed to you. Sign in with it, then change it straight away. ("Sorry, Email does not exist" means that email isn't registered.) |
| Change your own password (any user) | Top-right name menu → Change Password → New Password + Confirm Password. |
| Owner changing their own name, email or password | Settings → User Management → Admin User (section 13). |
| A staff member forgot theirs | Owner: User List → Edit → type a new password → Save. Tell them in person, and ask them to change it. |
5. More than one store: adding and switching
One email can own several stores — a second branch, a new line of business.
5.1 Adding a store
- Start Create a Store with the same email (or choose I already own a Store).
- At Account Found, choose Create a New Store Under This Account.
- Page 2 becomes Add New Store — Confirm Your Identity: enter your existing account password instead of choosing a new one, and press Add New Store.
| Refusal | Why |
|---|---|
| Wrong password | The existing account's password is needed to prove it's you. |
| Please verify your email before adding a store | See section 2. |
| You've reached your free-plan store limit | Freemium accounts are limited in how many stores they can hold. Subscribe on one of your existing stores to add more. |
| That store name is already taken | Store names are unique across all merchants. |
5.2 Switching
When your account has access to two or more stores, the store card at the top of the left menu (logo and store name) becomes a switcher: click the name and choose another store. You stay signed in. Staff see only the stores the owner has given them access to.
To see several stores' figures side by side, or move stock between them, use the Consolidator (see the Consolidator guide).
6. Profile Settings — your store's identity
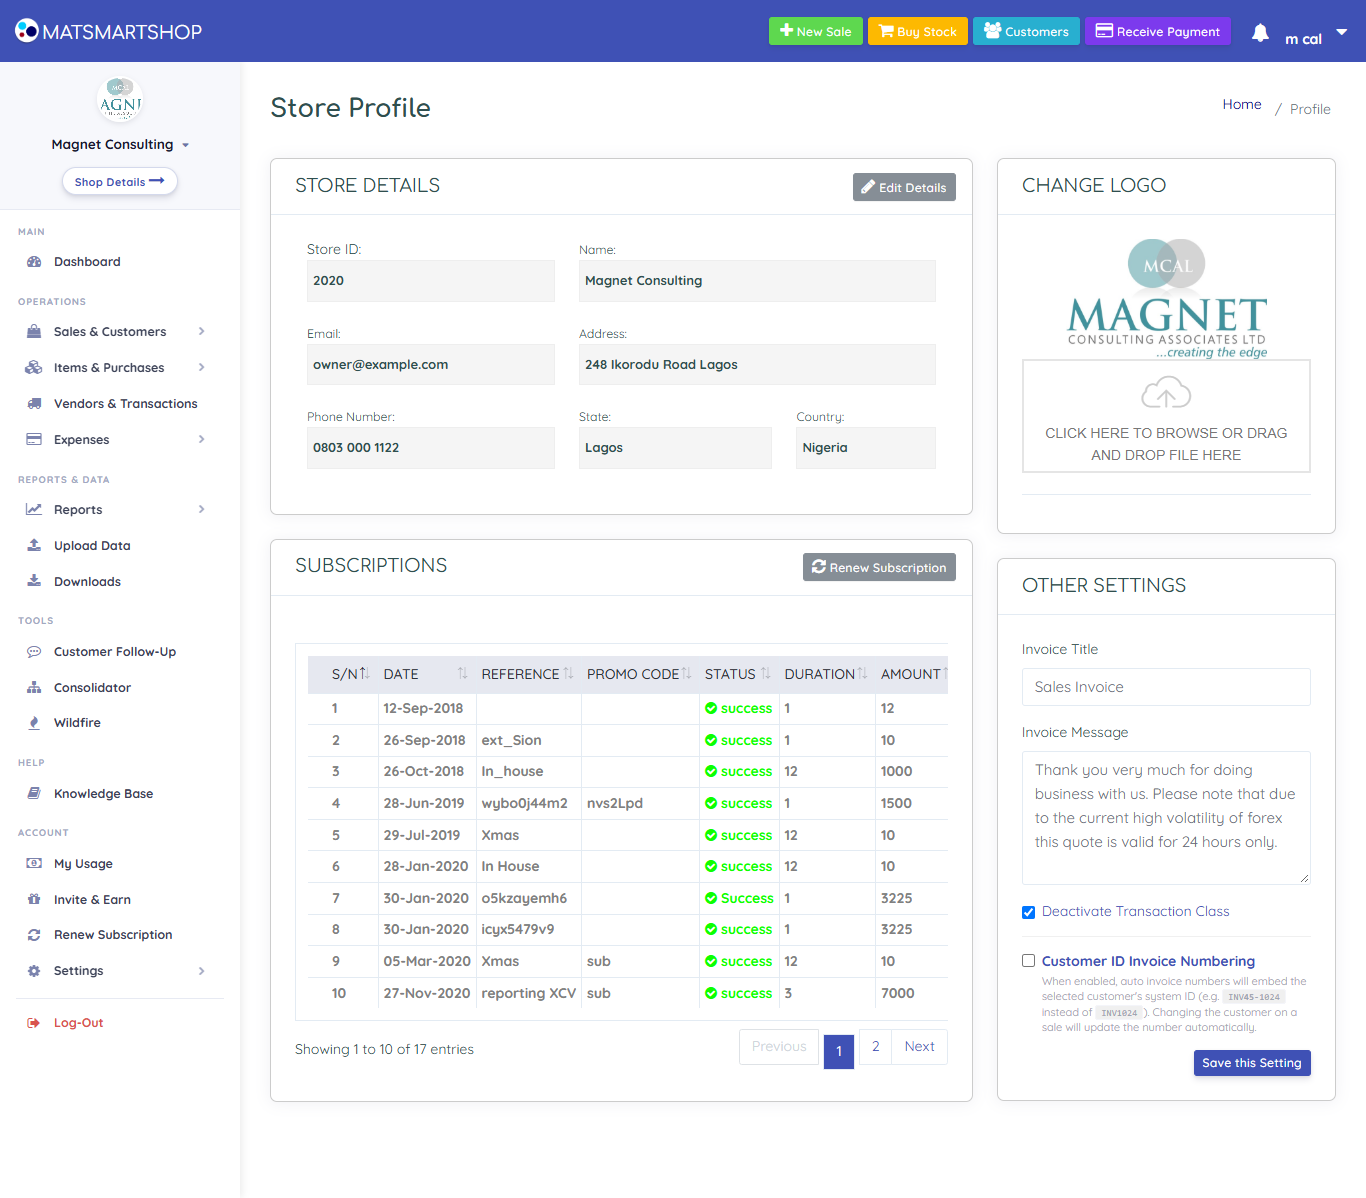
Open it from the top-right name menu → Profile Settings, or the Shop Details button under your store name in the left menu.
6.1 Store Details
Shows your Store ID (quote it when you contact support), name, email, address, phone, state and country. Edit Details changes them (section 7).
6.2 Change Logo
Choose a PNG or JPEG image up to 5 MB and press upload. The logo appears on your invoices, receipts and statements, and at the top of the left menu. A square image with a plain background prints best.
6.3 Other Settings
| Setting | What it does |
|---|---|
| Invoice Title | The heading printed at the top of every invoice — e.g. SALES INVOICE, TAX INVOICE or CASH SALES RECEIPT. |
| Invoice Message | Printed at the foot of every invoice. Use it for terms and courtesy: "Goods sold in good condition are not returnable. Thank you for your patronage!" |
| Transaction Class | Switches Transaction Classes on or off for the store (section 9). |
| Customer ID Invoice Numbering | When ticked, new invoice numbers include the customer's system ID — INV45-1024 instead of INV1024 — so you can tell at a glance whose invoice it is. Changing the customer on a sale updates the number. |
Press Save this Setting after changing any of these — nothing here saves on its own.
6.4 Subscriptions
The table lists your subscription history (date, reference, promo code, status, duration, amount). Renew Subscription goes to the plans page. Both are covered in the Usage, Billing & Help guide.
7. Edit Details — address, currency and tax
Profile Settings → Edit Details.
| Field | Notes |
|---|---|
| Company Name, Phone Number, Address | Printed on invoices and statements. |
| Website | Required by the form. If you have none, enter your storefront link or a dash. |
| Country, State | Your location. |
| Currency | The currency symbol shown on every amount. |
| Tax Rate | The percentage added as tax to sales (e.g. 7.5 for Nigerian VAT). Enter 0 if you don't charge tax. |
Every field must be filled — the form refuses with "Empty fields not allowed" otherwise. Press SAVE.
8. Payment Types
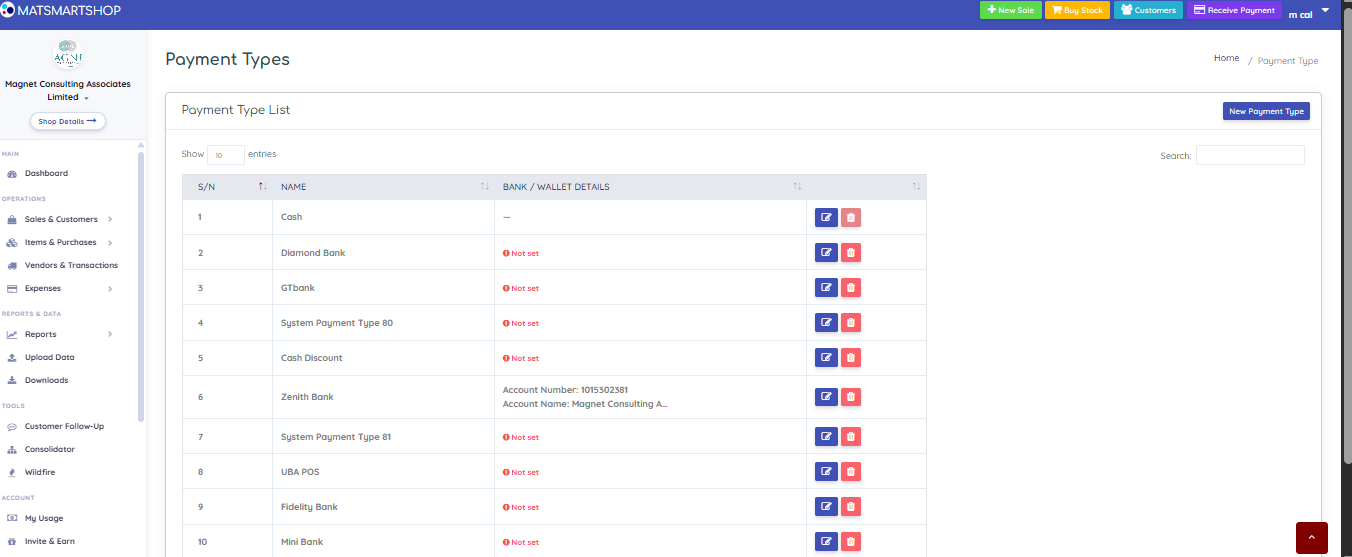
Settings → Payment Types lists the ways customers pay you and you pay others — each cash drawer, POS terminal and bank account. Every sale, receipt, expense and vendor payment is tagged with one, which is what makes the Dashboard's Cash Collections split possible.
8.1 Adding payment types
- New Payment Type → type a Name → ADD TO LIST. Repeat for others.
- SAVE. Duplicate names are refused ("Already exists!").
8.2 Bank / wallet details
The edit button opens Edit Payment Type, with a Bank / Wallet Details box. Type what a customer needs to pay you, one item per line:
These details appear on invoices where that payment type is chosen, so a customer paying later knows where to send the money. Cash never shows bank details.
Below it, Online payment link (optional) takes your own Paystack, Flutterwave or other payment page (it must start with https://, e.g. https://paystack.com/pay/yourshop). Customers then get a Pay online button beside the bank details: on the page opened by the {paylink} link in your text messages (see the Customer Follow-Up guide, section 12), and as the Pay button on the invoice link you share (Sales & Customers guide, 5.1). The Payment Types list shows the link's web address under the bank details.
8.3 Deleting
The bin deletes a payment type that has no transactions; otherwise you'll see "Payment Type Has Transactions". The built-in Cash type can't be deleted. To retire an old account, rename it (e.g. "OLD – Diamond Bank") so staff stop choosing it.
9. Transaction Classes
Transaction Classes let a single store label its sales and expenses by branch, department or line of business — "Pharmacy" vs "Supermarket", "Ikeja" vs "Yaba", "Retail" vs "Wholesale". They are optional; most single-counter shops never need them.
9.1 Switching them on
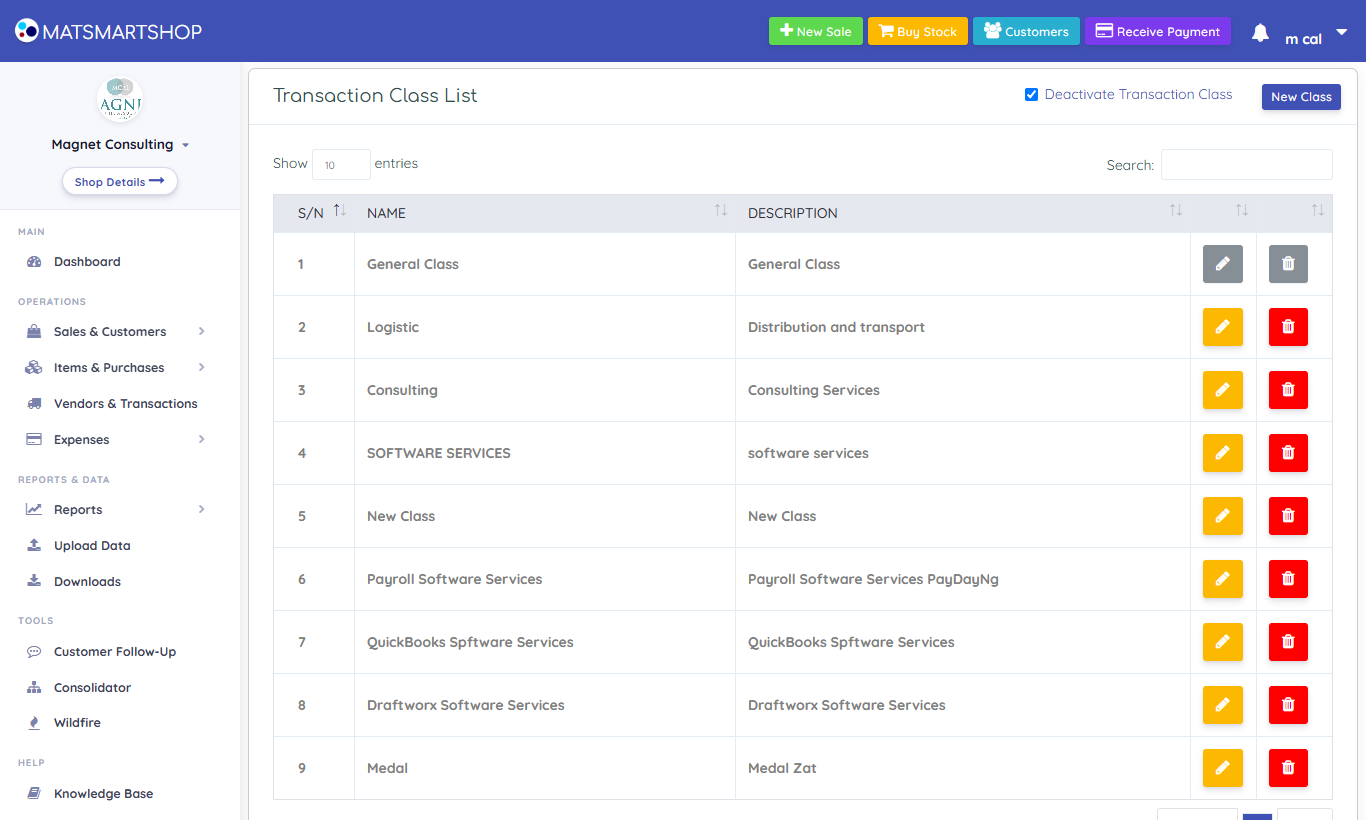
Settings → Transaction Class → tick Activate Transaction Class (the label then reads Deactivate Transaction Class). The same switch is on Profile Settings (remember Save this Setting there). While switched off, New Class is disabled and the class boxes on New Sale and New Expense are greyed out.
9.2 Managing classes
- New Class → Class Name and Description → ADD TO LIST → SAVE. A name already in use is refused.
- The pencil edits a class; the bin deletes one that has no transactions ("Transaction Exists" otherwise).
- GENERAL CLASS is built in and can't be edited or deleted — it's the catch-all.
The Transaction Class Report gives a profit and loss for each class; sales with no class appear under General Class (see the Dashboards & Reports guide, section 12).
10. Sales Points (tills)
A sales point is a till: a named place where sales are recorded, each with its own code (e.g. 2020-sp-3942). The website has a shared WEB point; each phone running the Android app and each desktop till claims a sales point of its own. Sales points are what let you see which till sold what, and what stop two devices from overwriting each other's records.
Open Settings → Sales Points.
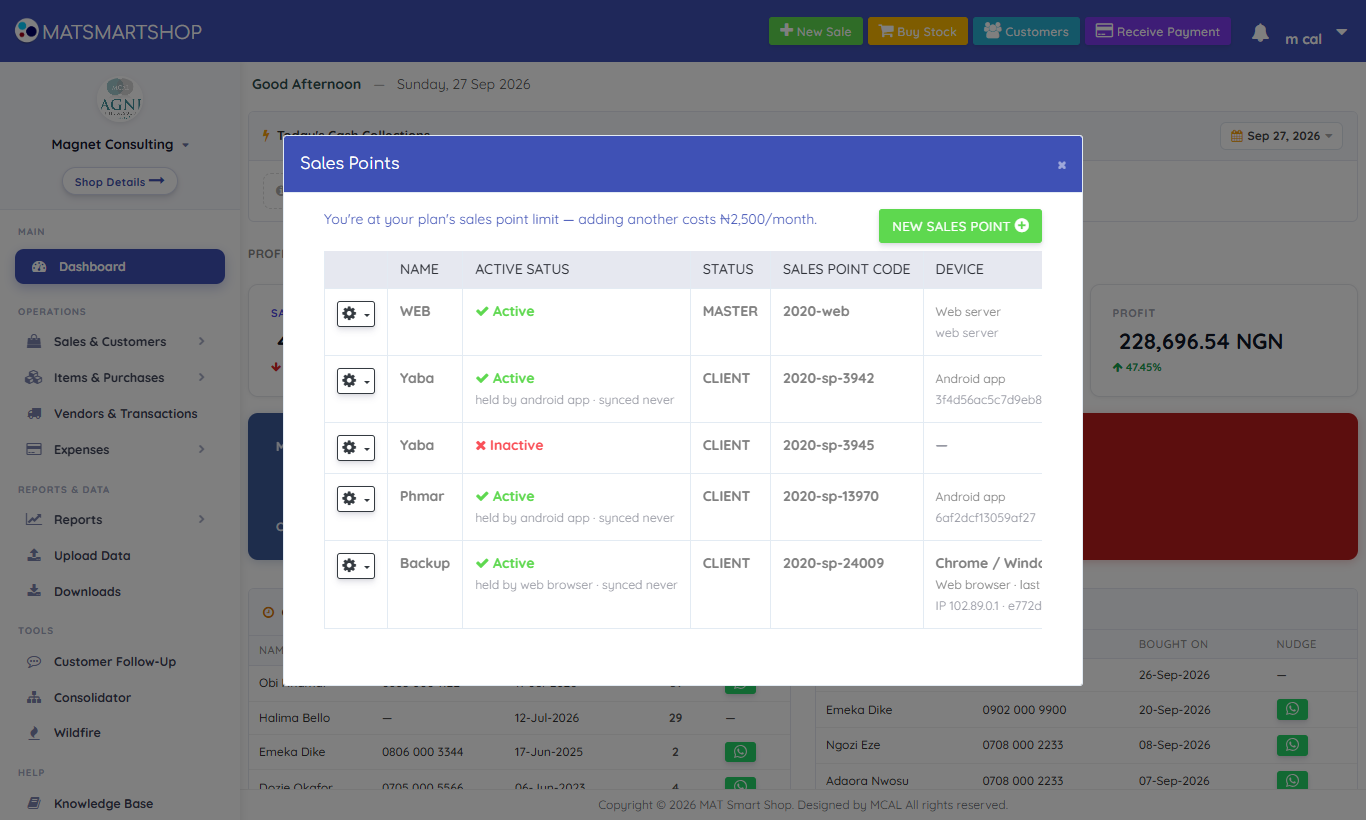
| Column | Meaning |
|---|---|
| Name / Sales Point Code | Your label, and the system's code for it. |
| Active Status | Whether a device currently holds it. |
| Device | Which device holds it and who last signed in there — or no sign-in recorded for this device. |
| Last Sync from / to server | When that device last downloaded and uploaded data. never seen syncing means it hasn't synced since this tracking began. |
| Manage | Deactivate a free till, or Release from device… a held one. |
10.1 Adding a sales point
- NEW SALES POINT → Name (e.g. "Front Counter", "Warehouse Phone") and an optional Description → ADD.
- Your plan includes a number of sales points. At the limit, the dialog says so and shows the price of an extra one; choose Monthly or Annual and pay through the checkout that opens. A paid extra sales point shows when it renews, with a Pay now link when it's due.
10.2 Releasing a till from a device
A till held by a device stays with that device — even while it's offline — so that sales stored on it are never lost. If the device is lost, broken or replaced, the owner can release it:
- Manage → Release from device…
- Check the details: which device, when it was last seen, when it last synced. The dialog warns how long the device has been offline.
- Enter a Reason (e.g. "phone stolen 12 Sept") — it's kept in the release log.
- Tick the confirmation and press RELEASE TILL.
11. Staff accounts: New User and User List
11.1 Creating a staff account
Settings → User Management → New User.
- First Name, Last Name.
- Username — the staff member's email address. It's what they sign in with and must not already be registered ("That username is already taken").
- Password — a starting password. Give it to them privately and ask them to change it (Change Password).
- User Permissions — the page opens with the Cashier role already ticked. Pick the role closest to the person's job under Start from a role, then add or remove individual permissions (section 12).
- Save. You're taken to the User List.
11.2 The User List
Settings → User Management → User List shows every account with its Status:
| Row shows | Actions |
|---|---|
| Active + ADMIN ACCOUNT | The owner. No actions here — use Admin User (section 13). |
| Active | Edit (details, password, permissions) · de-activate |
| In-Active | Edit · activate |
De-activate stops the person signing in anywhere, immediately, while keeping every sale they recorded attributed to them. Use it the day someone leaves. There is no delete — history must stay traceable.
11.3 Editing a staff account
Edit opens the user's details and their permissions, ticked as they are now.
- Change the name or username if needed. To set a new password, type it; leave the box blank to keep the current one.
- Adjust permissions — tick and untick, or click a role to start again from it. The line above the groups counts your changes, e.g. "18 of 75 selected · +3 / −1 unsaved".
- Press Save. A box lists exactly what will be Added and Removed. Press Save to confirm, or Go back to change it. (Cancel at the bottom of the page leaves without saving.)
The bottom of the page shows Recent permission changes — the last 20, newest first: when, who made the change, what was added and removed, and which role they started from. Changes made before this screen was introduced are not listed.
A user sees changed permissions the next time they sign in (or when their session renews, within the day). On the phone and the desktop till they arrive at the next sync.
12. Permissions, one by one
Permissions are the same everywhere: the website, the Android app and the desktop till read the same list. On the website they decide three things:
- Which pages open. A page the person can't use shows "no access" — and its link is removed from the left menu, the buttons at the top of the screen, the Reports page and the Upload Data page, so staff only see what they can use.
- Which buttons appear on a page (Add, Edit, Delete and the like).
- Where they land after signing in. Someone without the Dashboard goes straight to the first page they can use — usually New Sale.
12.1 Start from a role
The top of New User and Edit User offers five ready-made roles. Clicking one ticks its permissions (and unticks the rest); you then adjust. A role is only a starting point — nothing about it is stored on the user except in the change history.
| Role | Can | Can't |
|---|---|---|
| Cashier | Make sales and quotations, turn quotations into sales, see sales, add customers, record customer payments, check a customer's transfer receipt, see receipts, look up items. | See costs, profit or reports; change items or prices; delete anything. |
| Sales rep | Everything a cashier can, plus edit customer details, the customer follow-up report, and (on the phone) customer balances and top customers. | See profit, costs or stock value; purchases; delete anything. |
| Stock keeper | Add and edit items (including prices), record purchases, adjust stock, manage vendors, see stock value. | Sell, delete sales, see profit, manage users. |
| Accountant | Every report including profit and loss and tax; record, edit and delete expenses; budgets; see sales, customers, purchases and vendors; record customer payments. | Sell, change stock or prices, manage users. |
| Store manager | Everything needed to run the shop day to day, including Bank & Cash (see money, record money moved, upload statements, check with bank, skip and correct), balances brought in, approving expenses and giving advances, and meeting attendance. | Manage users and permissions, the owner account, Shop Details, the subscription, Login Audit and data downloads — those stay with the owner. |
Below the roles: a Find a permission box (try "price", "delete", "report"), the count of what's ticked, and the permissions in groups. Each group has All and None buttons. Every permission has a one-line description of what it allows; ones marked App only affect the Android app. The Mobile app group starts folded — click its name to open it.
12.2 The permissions
| Group | Permission | What it allows |
|---|---|---|
| Dashboard | Dashboard | Open the dashboard: sales, profit and stock at a glance. Without it, the person starts on New Sale (or the first page they can use). |
| Sales | Sales – View | The Sales & Quotation List; open invoices; the Sales Report and Sales by Item report. |
| Sales | Sales – Add | New Sale & Quotation, and the Sales upload. A cashier needs this; Sales – View lets them find past invoices. |
| Sales | Sales – Edit | Change a sale after it is saved (Edit Sale). |
| Sales | Sales – Delete | Delete sales, and see (and restore) Deleted Sales. Keep for supervisors. |
| Sales | Quotations – View / Convert / Delete | See quotations, turn one into a sale, delete one. |
| Sales | Delete Other Transactions | Delete purchases, expenses and customer payments (not sales). |
| Customers | Customers – View | Customer Center, statements, customer transactions, Customers Who Owe, and the Customer Follow-Up (SMS) page. |
| Customers | Customers – Add | Add customers, one by one or from a spreadsheet. |
| Customers | Customers – Edit | Change customer details. |
| Customers | Customers – Delete | Delete customers. |
| Customers | Customers – Set Balances Brought In | Enter or change what customers owed before SmartShop (Balances brought in). Seeing them only needs Customers – View. |
| Customers | Customers – Record Meeting Attendance | Associations: add meetings and record who came (Meetings & Attendance). Seeing them only needs Customers – View. |
| Customers | Customer Payment | Record money a customer pays you (Receive Payment). |
| Customers | Receipts – View | The receipts list and Receipts report. |
| Stock & purchases | Inventory – View | Item List, item details, Inventory Center, stock movement and Stock Health. |
| Stock & purchases | Inventory – Add | Add items, one by one or from a spreadsheet. |
| Stock & purchases | Inventory – Edit | Change items, including selling prices and Price upload. |
| Stock & purchases | Inventory – Delete | Delete items. |
| Stock & purchases | Purchases – View | Purchase & Adjustment List; also opens the Vendors pages and What You Owe Vendors. |
| Stock & purchases | Purchases – Add | Record stock bought, including the Purchases upload. |
| Stock & purchases | Stock Adjustment | Correct stock counts without a purchase (damage, loss, recount), including the Stock Adjustments upload. Sensitive. |
| Stock & purchases | Vendors – View / Add / Edit | The Vendors pages, adding vendors, changing their details. |
| Stock & purchases | Vendors – Delete | Delete vendors. |
| Expenses & budgets | Expenses – View / Add / Edit / Delete | The Expense List and Expense Report; record expenses; change one after saving; delete one. |
| Expenses & budgets | Expenses – Approve Payments and Give Advances | Approve or reject expenses waiting for approval, and give staff (or officers) cash advances. If the approval rule lists its approvers, only they and the owner approve. See the Expenses, Vendors & Budgets guide, sections 10 and 11. |
| Expenses & budgets | Expense Classes – View / Add / Delete | Expense Types. |
| Expenses & budgets | Budget – View / Add / Delete | Budgets. |
| Expenses & budgets | Budget – View Sales | The budget-against-actual comparison. |
| Reports & data | Report – Sales | Sales Analysis (cashiers, tills, busy hours, trends) and the Transaction Class report. The Sales Report and Sales by Item also open with Sales – View. |
| Reports & data | Report – Profit & Loss | Profit and Loss, Item Profitability and the cost-of-sales breakdown. Shows your margins — keep for the owner and accountant. |
| Reports & data | Report – Inventory Value | What your stock is worth at cost (Stock Health also opens with Inventory – View). |
| Reports & data | Report – Expense | The Expense Report (also opens with Expenses – View). |
| Reports & data | Report – Tax | The Tax report. |
| Reports & data | Report – Customer Follow-Up | Customers who have gone quiet or bought only once (also opens with Receipts – View). |
| Reports & data | Download / Export Data | The Downloads page — your whole store's data. Owner only unless given. |
| Bank & Cash | Bank & Cash – See Money | Open Bank & Cash: how much is in each account and the till, and where it went. |
| Bank & Cash | Bank & Cash – Record Money Moved | Record money moved between accounts (e.g. cash taken to the bank). |
| Bank & Cash | Bank & Cash – Set Up Accounts | Add accounts and starting balances, and set up payment methods. |
| Bank & Cash | Bank & Cash – Upload Statements | Upload or photograph a bank statement. |
| Bank & Cash | Bank & Cash – Check With Bank | Do the month's Check with bank: link lines and answer SmartShop's questions. |
| Bank & Cash | Bank & Cash – Skip & Correct | Skip a bank line or record a correction. |
| Bank & Cash | Bank & Cash – Open Checked Months | Open again a month that was already marked as checked. Keep for the owner. |
| Bank & Cash | Transfer Receipts – Check and Credit | Check a Transfer Receipt: upload a customer's transfer receipt, see if it looks genuine, and credit it (uses usage units). The Cashier role has it. |
| Bank & Cash | Transfer Receipts – Accept Anyway / Take Back | Credit a receipt SmartShop said not to accept (with a reason), and take back a credit the bank never showed. |
| Shop settings | Payment Types – View / Add | See and add payment types. |
| Shop settings | Payment Types – Edit / Delete | Change or delete a payment type — including the bank details printed on every invoice and the online payment link. Give sparingly. |
| Shop settings | Sales Class – View / Add / Edit / Delete | Transaction Classes. |
| Shop settings | Sales Point – Manage | Settings → Sales Points: set up and release tills. |
| Shop settings | Scan / Upload Document | Scan a paper report or receipt (uses usage units). |
| Shop settings | Edit Shop | Shop Details / Profile Settings: name, logo, contact details, invoice settings. |
| Shop settings | Subscription | See and renew the subscription. (Wildfire / Loyalty is an app setting.) |
| Users & security | Users – View | The User List. |
| Users & security | Users – Add / Edit / Delete | New User; editing users and their passwords. |
| Users & security | User Permissions | Change what other users can do. |
| Users & security | Admin User | The Admin User page (the owner account). Normally never given. |
| Users & security | Login Audit – View | Settings → Login Audit. Owner only unless given. |
| Mobile app | Dashboard shortcuts and panels; Download From Web | The Android home screen's Add Item, Add Customer, Enter Sales, Enter Purchase, Profit & Loss, Customer Balance, Low Stock, Top Customers and Sync tiles, and downloading the shop's data to the phone. |
12.3 What staff see without a permission
| Missing | What happens |
|---|---|
| The permission a page needs | The link is gone from the menu; opening the page directly shows "no access". |
| Add / Edit / Delete on a page they can open | The matching button isn't shown (e.g. no Delete on sales, no New Payment Type). |
| Dashboard | They start on New Sale, or the first page they can use. |
| Inventory – Add / Customers – Add | The Items / Customers cards disappear from Upload Data. |
| Purchases – Add and Stock Adjustment | The Buy Stock button at the top of the screen disappears. |
| Customer Payment | The Receive Payment button at the top of the screen disappears. |
| Sales Point – Manage | Settings → Sales Points disappears from the menu. |
13. Admin User — the owner's own account
Settings → User Management → Admin User (owner only, unless a user is given the Admin User permission) edits the owner account: First Name, Last Name, Email (the owner's sign-in username), and a new Password with Confirm Password. Press Save — "Admin user edited successfully".
14. Login Audit
Settings → Login Audit is the record of every sign-in to your store — who, when, at which till, and from which device. Only the owner sees it, unless a staff member is given Login Audit – View.
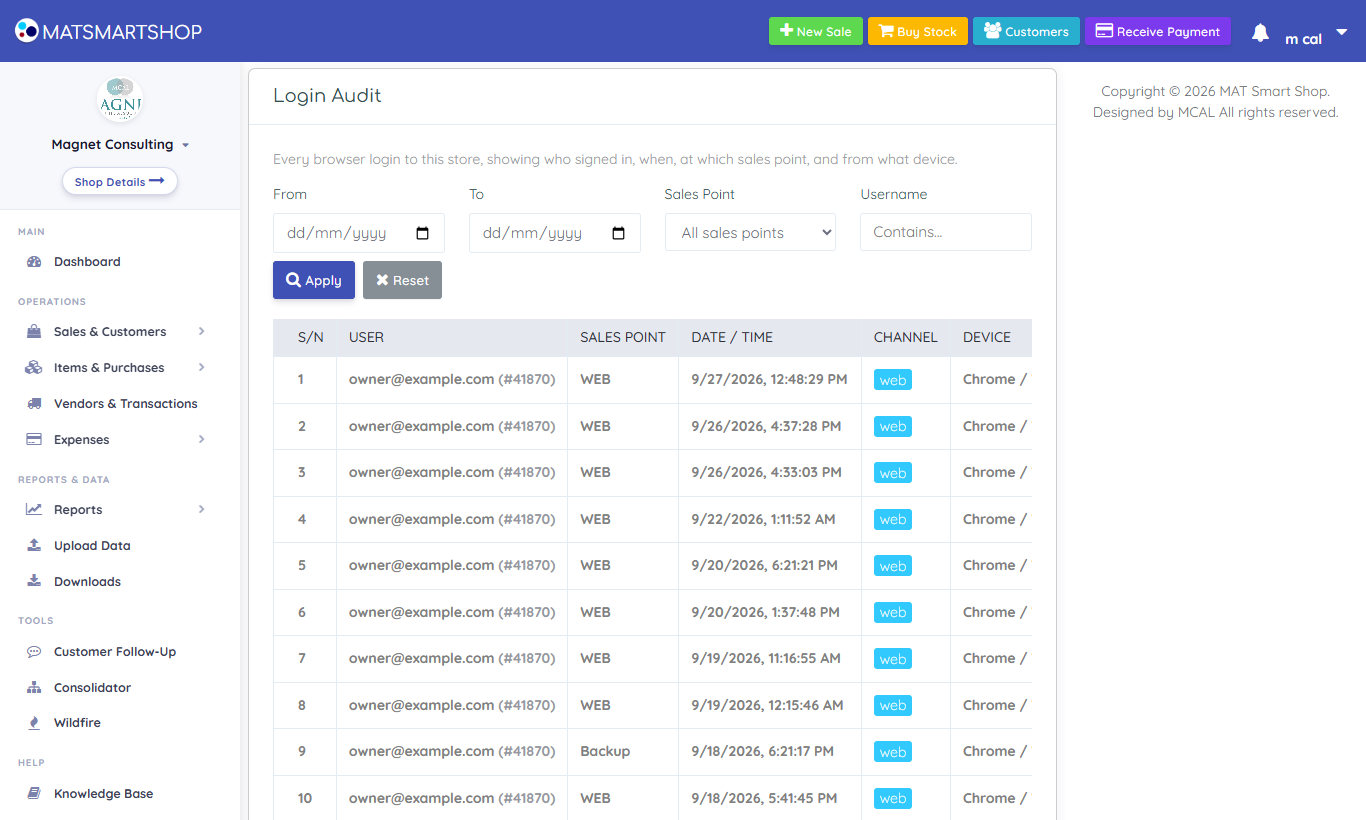
| Column | Meaning |
|---|---|
| User | Who signed in, with their user number. |
| Sales Point | The till they chose at step 2. |
| Date / Time | When. |
| Channel | web (browser) or desktop (the Windows till). |
| Device | Browser and operating system, e.g. "Chrome / Windows 10/11", or the till's name. |
| IP / Device Id | The network address and the device's unique ID — the same Device Id means the same browser or machine. |
Filter with From/To dates, a Sales Point, or part of a Username, then Apply. Reset clears the filters.
15. A security checklist
- Owner email is one you'll keep, and it's verified.
- Owner password is long, unique, and known only to the owner.
- Every staff member has their own account — no shared logins.
- Staff have only the permissions their job needs — start from the nearest role and remove what they don't use; Delete, Report – Profit & Loss and Payment Types – Edit are rare.
- Only the owner (or one trusted manager) has User Permissions; check a user's Recent permission changes when something looks odd.
- Leavers are de-activated the same day.
- Tills are named so you know which device is which; lost devices are released promptly (after syncing if at all possible).
- Login Audit is glanced at weekly.
- Payment types match real accounts, so collections can be reconciled daily.
16. Quick reference and troubleshooting
| I want to… | Go to |
|---|---|
| Change the logo, invoice heading or footer | Profile Settings |
| Change address, phone, currency or tax rate | Profile Settings → Edit Details |
| Add a bank account customers can pay into | Settings → Payment Types → edit → Bank / Wallet Details |
| Let customers pay online from a text or invoice link | Settings → Payment Types → edit → Online payment link |
| Let a cashier check transfer receipts | User List → Edit → tick Transfer Receipts – Check and Credit (the Cashier role has it) |
| Add a staff member | Settings → User Management → New User |
| Stop someone signing in | User List → de-activate |
| Change what someone can do | User List → Edit (start from a role, then adjust) |
| See who changed someone's permissions | User List → Edit → Recent permission changes |
| Free a till from a lost phone | Settings → Sales Points → Release from device… |
| See who signed in, and when | Settings → Login Audit |
| Add another store | Create a Store with the same email → Create a New Store Under This Account |
| Change my own password | Name menu → Change Password |
If something looks wrong
- "No sales points found" at sign-in. The account may not be linked to the store correctly. Contact support with the Store ID and the user's email.
- All tills say "in use". Use WEB, or have the owner release a till.
- A staff member sees "no access", or a menu item is missing. They lack the permission that page needs (section 12.2). Edit their account and tick it; they see it at their next sign-in.
- A button is missing for a staff member. They lack the Add / Edit / Delete permission for it (section 12.3).
- A staff member starts on New Sale instead of the Dashboard. They don't have the Dashboard permission — intended for cashiers.
- "You cannot give permissions you do not have yourself". You are editing as a manager, not the owner. Untick the permissions named, or ask the owner.
- "You cannot change your own permissions". Ask the owner (or another user with User Permissions).
- "Your account is not allowed to do this. Ask the shop owner for: …". The server refused an action the person isn't permitted — the message names the permission to give them.
- The Transaction Class box is greyed out. Transaction Classes are switched off for the store.
- "Empty fields not allowed" on Edit Details. Fill every field, including Website.
- My logo won't upload. It must be PNG or JPEG and no more than 5 MB.
- The yellow "email is not verified" banner won't go away. Click HERE to resend, then click the link in the email.
- Invoice numbers suddenly include a number in the middle. Customer ID Invoice Numbering has been switched on in Profile Settings.